INT NLE Tools User Guide
INT NLE Tools v1.0 for macOS
Last updated: 2026-06-10
This document is a detailed manual for users after installing INT NLE Tools.
The current version of INT NLE Tools v1.0 is for macOS. A Windows version is planned for a future release.
Table of Contents
- 1. Overview of INT NLE Tools
- 2. System and Installation Requirements
- 3. Installed Components
- 4. Quick Start
- 5. Pull-down TC Display
- 6. Timeline TC Monitoring
- 7. INT TC Sender for Premiere
- 8. Migrating from INT TimeCode Tool v1.0.1
- 9. Known Limitations
- 10. Uninstall
- 11. Rights Notices and License
1. Overview of INT NLE Tools
INT NLE Tools v1.0 for macOS is a tool set for making timecode easier to check during editing.
The current version provides two main features.
Pull-down TC Display.
When editing a 23.976fps timeline in Blackmagic Design DaVinci Resolve, you can check converted TC equivalent to 29.97DF / 59.94DF after 2:3 pull-down processing, for broadcast and similar delivery formats.
In INT TimeCode Tool, you can switch between Timeline TC, Dual, which displays the timeline timecode and converted timecode at the same time, and Converted, which displays only the converted timecode. By using INT_BurnIn (Fusion Title), you can also display the TC in the DaVinci Resolve viewer or video output.
Timeline TC Monitoring.
You can check the NLE Timeline TC in a browser on a tablet, computer, or other device on the same network.
Timeline TC Monitoring consists of three functions: Sender, Server, and Receiver. Sender sends TC from the NLE. In DaVinci Resolve, INT TimeCode Tool is used as the Sender. In Adobe Premiere, INT TC Sender for Premiere is used as the Sender. INT TC Server acts as the Server, relaying information received from the Sender to Receiver. Receiver is the browser display screen built into INT TC Server. It can be opened not only in a browser on the same Mac, but also in a browser on a tablet, computer, or other device on the same network.
The detailed role and usage of each tool are explained in the following chapters.
2. System and Installation Requirements
Before using INT NLE Tools, check the following operating environment and prerequisites.
2.1 Supported OS
This document covers the macOS version of INT NLE Tools.
Supported OS versions follow the OS requirements specified by the target applications. On unsupported OS environments, installation may fail or the tools may not operate correctly.
2.2 Supported Applications
INT NLE Tools is intended for use together with the following video production software.
- DaVinci Resolve / DaVinci Resolve Studio 20 or later
- Adobe Premiere 2024 or later
2.3 Permissions Required for Installation
Installing INT NLE Tools may require macOS administrator privileges.
2.4 Network Requirements
When using Timeline TC Monitoring, the machine running INT TC Server and the machine or device displaying Receiver must be able to communicate within the same local network.
An internet connection is not required. What is required is that the devices being used can reach each other within the local network.
In company, broadcast facility, or studio networks, device-to-device communication may be restricted by security settings. If you cannot connect, check the network-related explanation in Chapter 6.
3. Installed Components
INT NLE Tools v1.0 for macOS mainly installs the following components.
- INT TimeCode Tool
- INT_BurnIn (Fusion Title)
- INT TC Sender for Premiere
- INT TC Server
- Resources
- Uninstaller
INT TimeCode Tool
- Installation location:
/Library/Application Support/Blackmagic Design/DaVinci Resolve/Workflow Integration Plugins/INTTimeCodeTool
- This is a Workflow Integration Plugin for DaVinci Resolve. In Pull-down TC Display, it switches the display between Timeline TC / Dual / Converted. In Timeline TC Monitoring, it also works as the Sender that sends Timeline TC from DaVinci Resolve to INT TC Server.
INT_BurnIn (Fusion Title)
- Installation locations:
/Applications/INT NLE Tools/Resources/BurnIn/
/Library/Application Support/Blackmagic Design/DaVinci Resolve/Fusion/Templates/Edit/Titles/
- This is a Fusion Title used on the DaVinci Resolve timeline. It displays the Pull-down TC Display TC in the DaVinci Resolve viewer, SDI / HDMI output, and rendered video.
INT TC Sender for Premiere
- Installation location:
/Applications/INT NLE Tools/Resources/Sender for Adobe Premiere/
- This is a Sender for sending Timeline TC from Premiere to INT TC Server. Use it when using Premiere with Timeline TC Monitoring.
INT TC Server
- Installation location:
/Applications/INT NLE Tools/INT TC Server.app
- This is the Server that relays TC information received from Sender to Receiver. Receiver is the browser display screen built into INT TC Server. You can check Timeline TC in a browser on the same Mac or in a browser on a tablet, computer, or other device on the same network.
Resources
- Installation location:
/Applications/INT NLE Tools/Resources/
- This area contains auxiliary files used by INT NLE Tools, such as INT_BurnIn, INT TC Sender for Premiere, and Documentation.
Uninstaller
- Installation location:
/Applications/INT NLE Tools/Uninstall INT NLE Tools.app
- This tool removes INT NLE Tools.
4. Quick Start
4.1 Using Pull-down TC Display
When editing a 23.976fps timeline in DaVinci Resolve, you can check converted TC equivalent to 29.97DF / 59.94DF after 2:3 pull-down processing, for broadcast and similar delivery formats. Details are explained in 5. Pull-down TC Display.
- Launch DaVinci Resolve.
- From the menu bar, choose Workspace / Workflow Integration / INT TimeCode Tool.

- Click the gear icon in the upper right of the window to open the Settings screen.
- In the Settings screen, switch between Timeline TC / Dual / Converted.

- Confirm the TC in INT TimeCode Tool.
To display TC on the DaVinci Resolve video as well, use INT_BurnIn (Fusion Title). INT_BurnIn is explained in 5.3 Displaying TC on Video with INT_BurnIn.
4.2 Using Timeline TC Monitoring
You can check the NLE Timeline TC in a browser on a tablet, computer, or other device on the same network. Details are explained in 6. Timeline TC Monitoring. In DaVinci Resolve, INT TimeCode Tool acts as the Sender. In Premiere, INT TC Sender for Premiere acts as the Sender.
Note: Timeline TC Monitoring requires the machine running INT TC Server and the machine or device displaying Receiver to be able to communicate within the same local network.
In company, broadcast facility, or studio networks, device-to-device communication may be restricted. If you cannot connect, check the network-related explanation in Chapter 6.
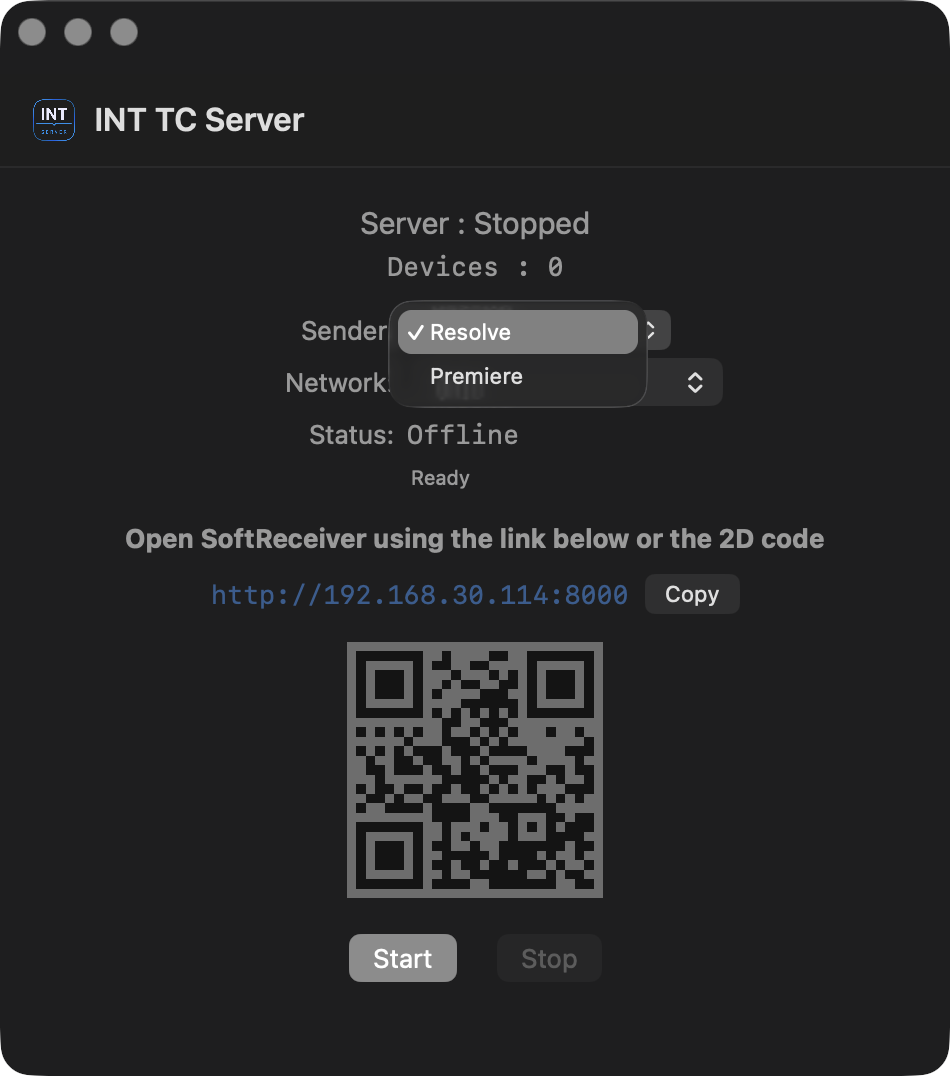
- Launch INT TC Server.
- In INT TC Server, choose DaVinci Resolve / Premiere from the Sender pull-down menu, then press the start button to start the Server function.

- Open the URL or QR code shown in INT TC Server in a browser to display Receiver, and keep it open.
In environments with multiple network interfaces, choose the interface that is on the same network as the Receiver device from the Network menu in INT TC Server. The QR code is updated to match the selected LAN URL. To share the URL manually, use the Copy button to copy the current Receiver URL.
- Turn on the Sender function.
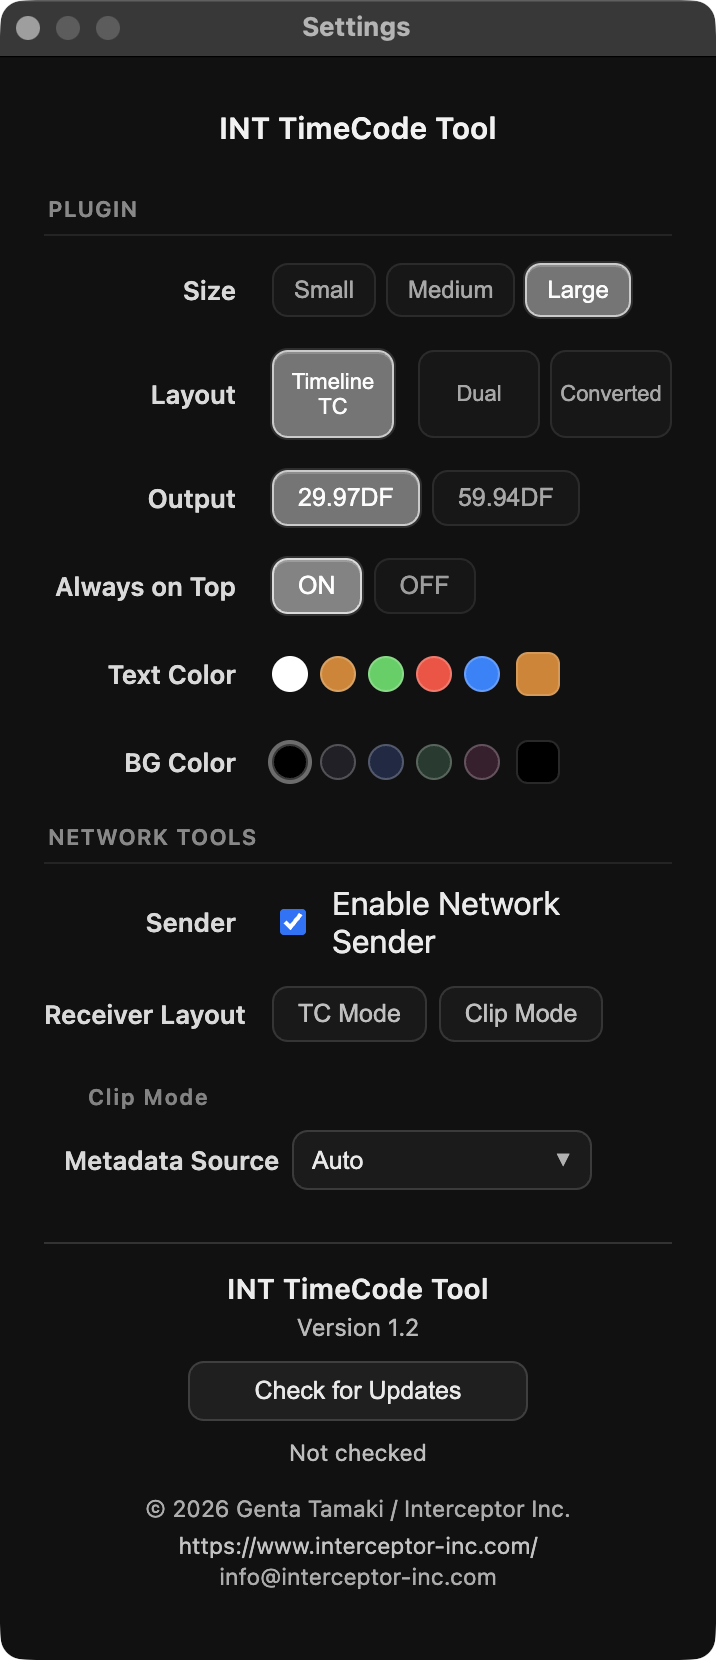
For DaVinci Resolve, open INT TimeCode Tool and turn Sender ON in the Settings screen.
For Premiere, send TC using INT TC Sender for Premiere.
- Confirm that Timeline TC is displayed in Receiver.
- Switch Receiver between TC Mode / Clip Mode as needed.
TC Mode is the normal display for checking Timeline TC / Dual / Converted. See 6.2 Displaying Timeline TC in Receiver with TC Mode for details. Clip Mode is used to check metadata such as File / Frame / SourceTC at the stopped position, and the metadata fields display "-" during playback. See 6.3.1 Displaying Metadata in Clip Mode for details.
For Premiere, install INT TC Sender for Premiere according to your environment. See 7. INT TC Sender for Premiere for details.
5. Pull-down TC Display
When editing a 23.976fps timeline in DaVinci Resolve, you can check converted TC equivalent to 29.97DF / 59.94DF after 2:3 pull-down processing, for broadcast and similar delivery formats.
If needed, display it on the video using INT_BurnIn (Fusion Title).
5.1 Checking TC with INT TimeCode Tool
When you open INT TimeCode Tool in DaVinci Resolve, you can check the DaVinci Resolve Timeline TC. Immediately after launch, or in the initial state, Timeline TC is displayed.
- Lower left of the window: Current timeline frame rate
- Center: Timeline TC
- Upper right: Gear icon. Opens the Settings screen
- Lower right: Always on top icon. When ON, INT TimeCode Tool stays in front
5.2 Settings and Display Modes
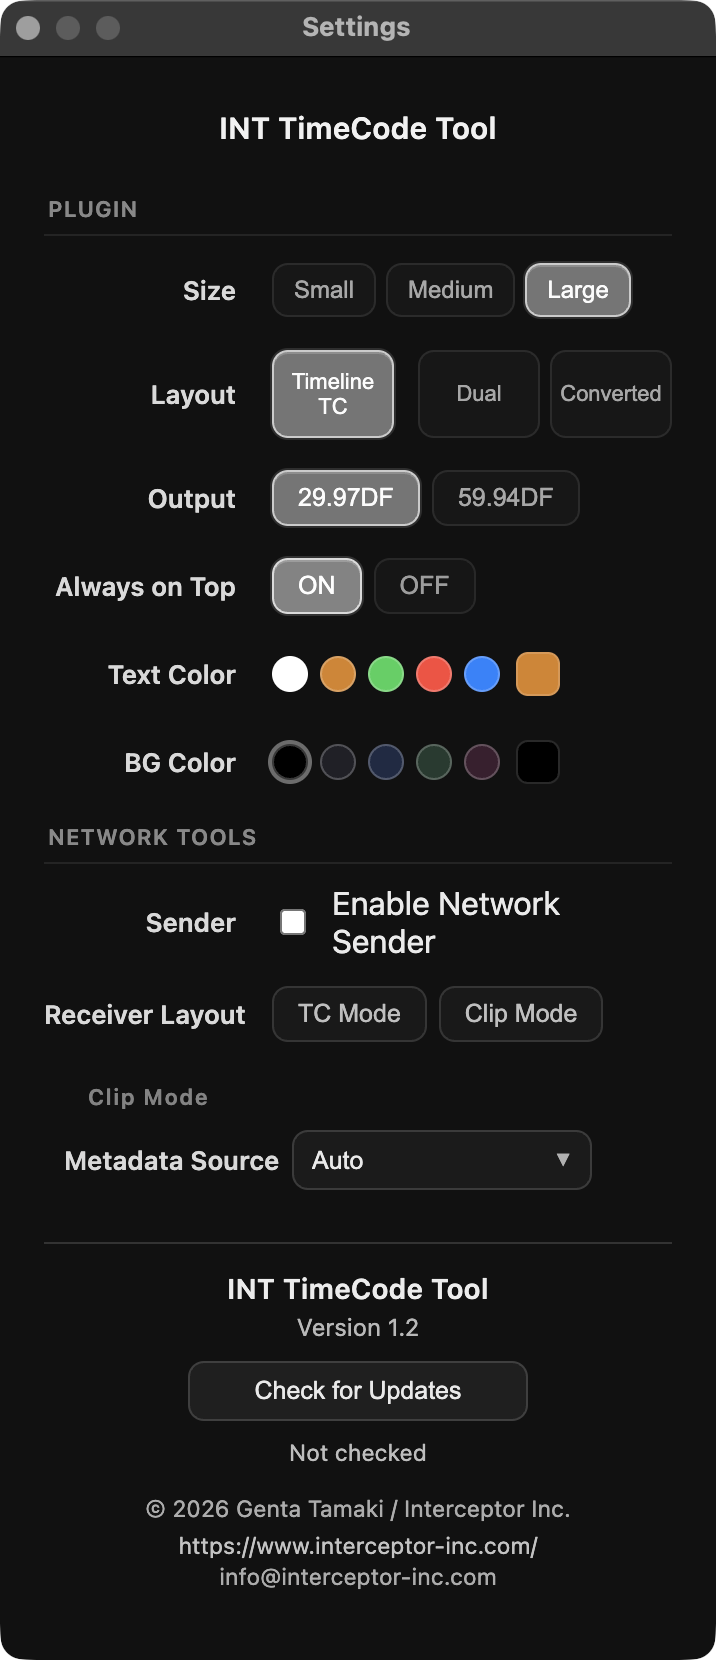
In the Settings screen, you can change the display to TC for 29.97DF / 59.94DF and change the timecode display font color. Click the gear icon in the upper right to open the Settings screen.
The Settings screen has PLUGIN and NETWORK TOOLS sections. This chapter mainly explains the PLUGIN settings.
Plugin
- Size: Select a preset size from Small / Medium / Large. You can also drag the four corners of the INT TimeCode Tool window to set any size.
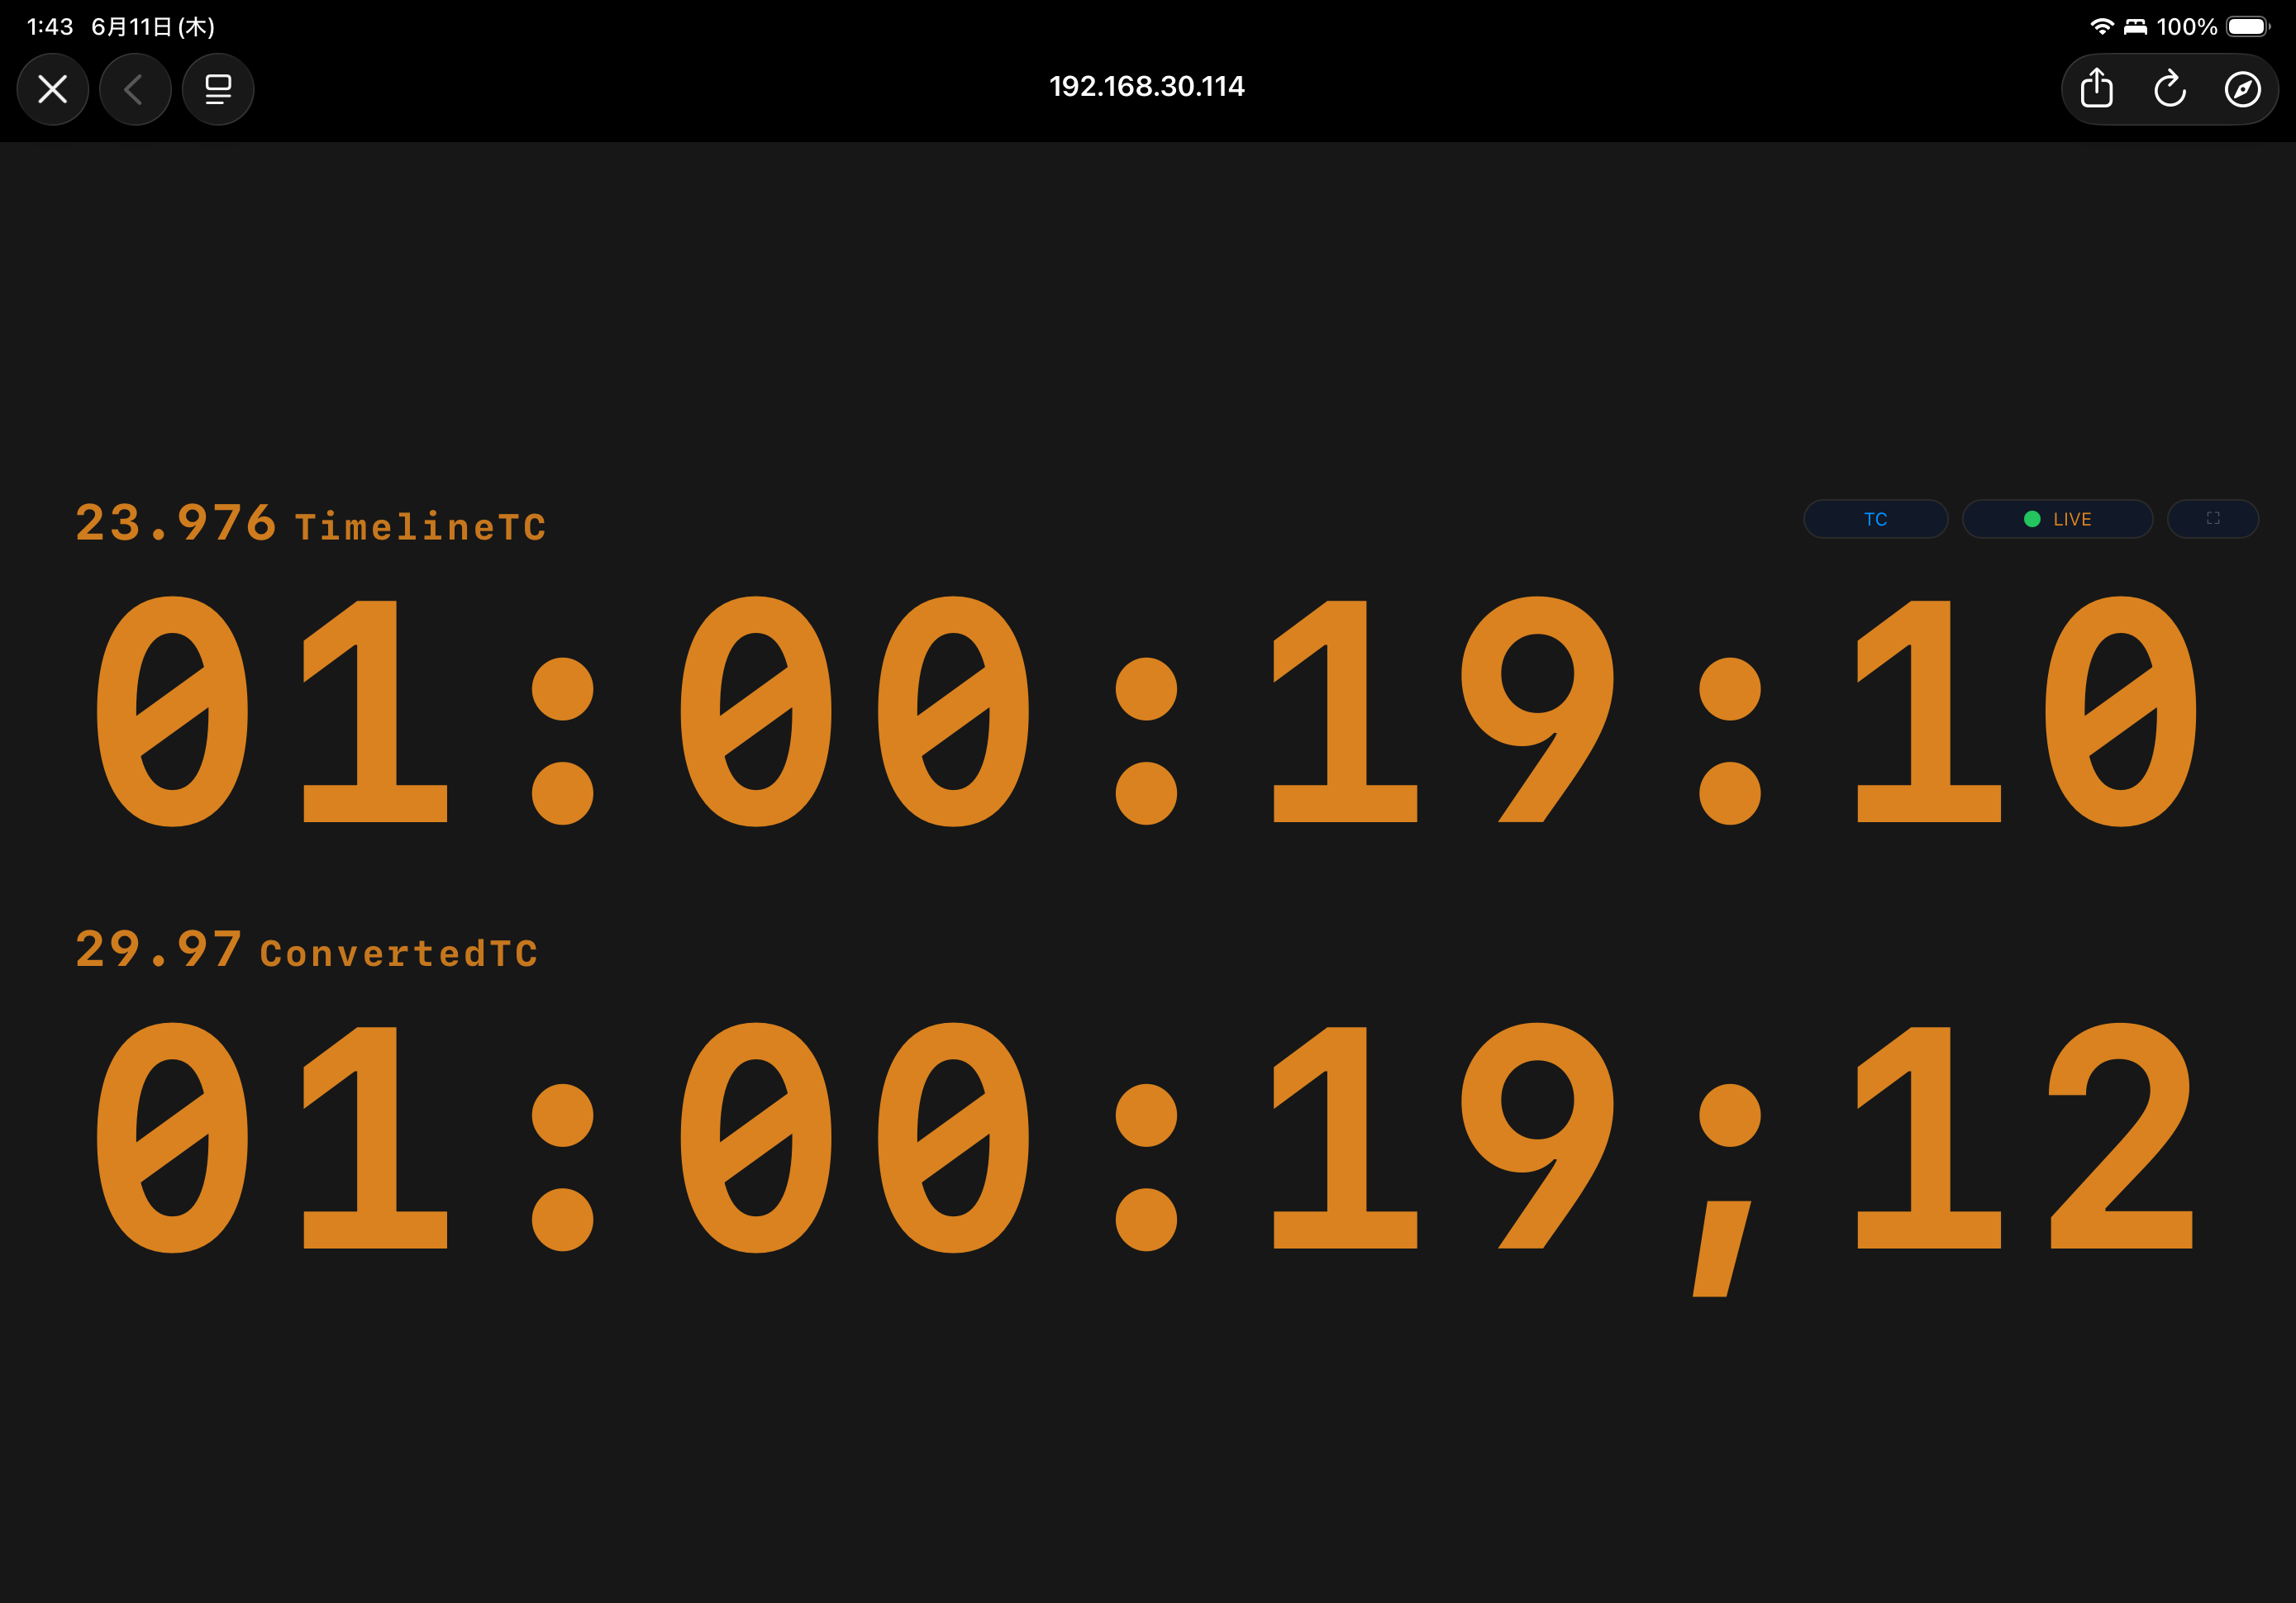
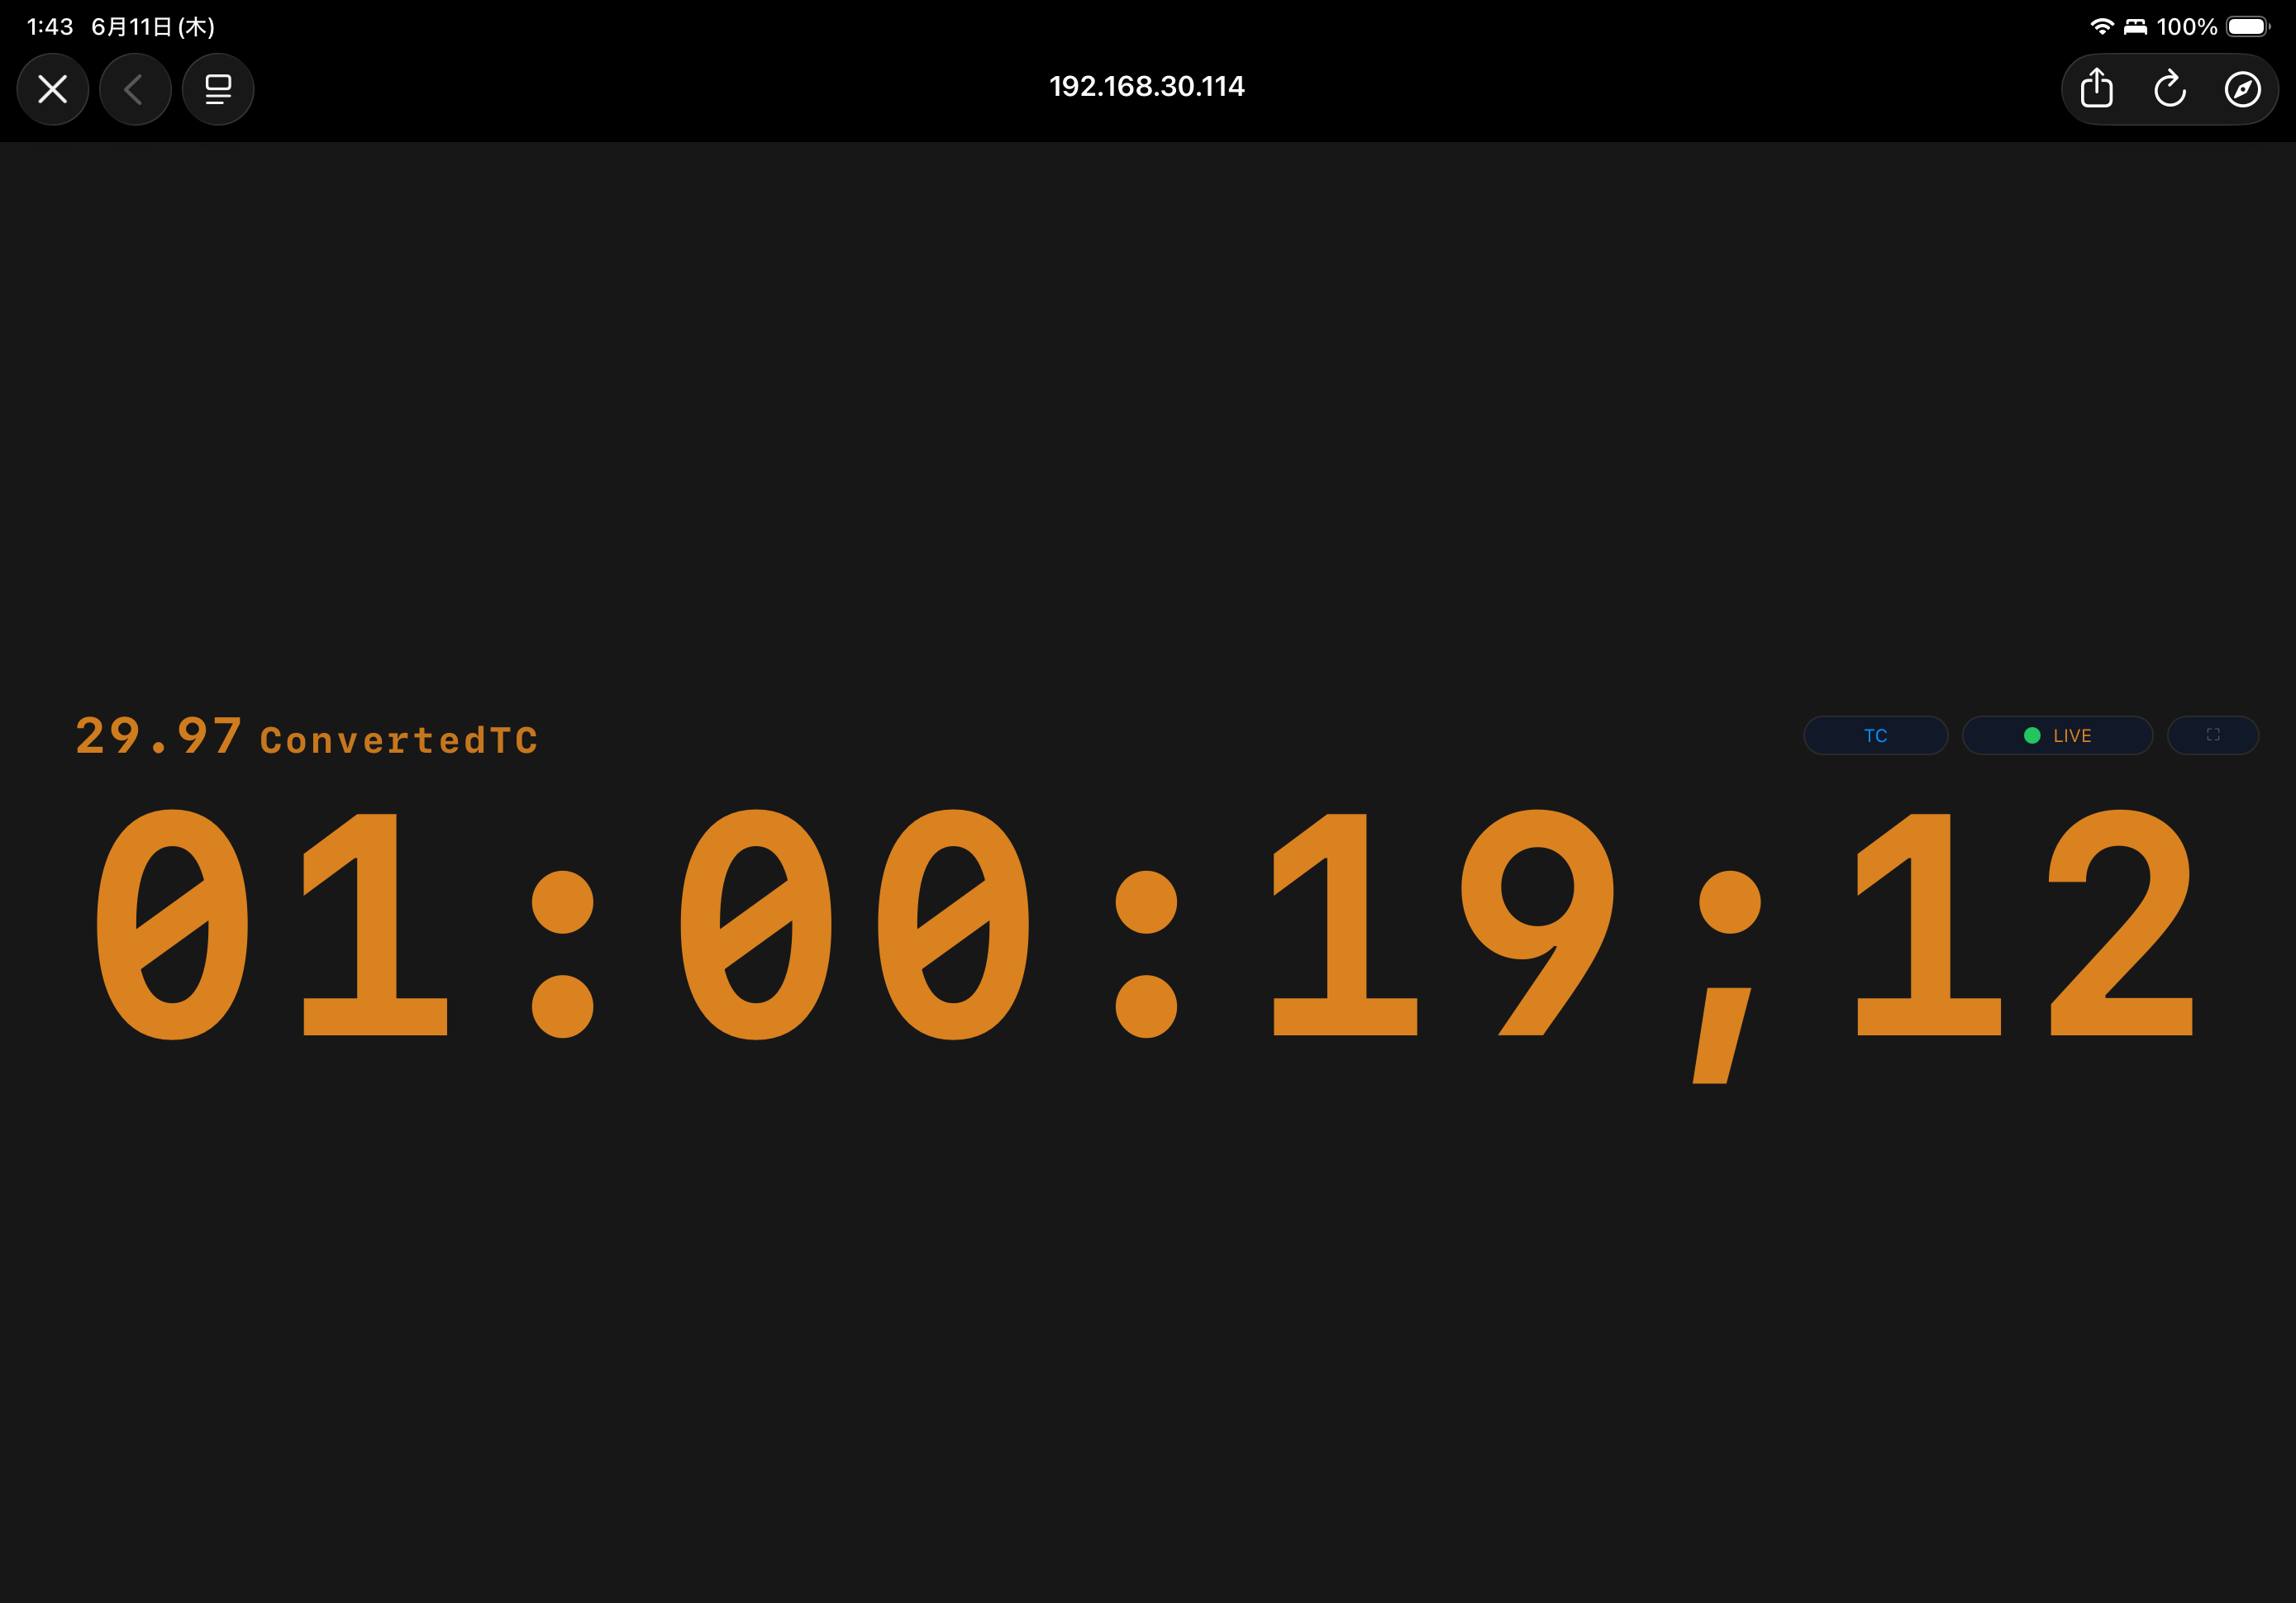
- Layout: Select the display mode in INT TimeCode Tool from Timeline TC / Dual / Converted.
- Output: Select the output format for Converted TC from 29.97DF / 59.94DF.
- Always on Top: When ON, INT TimeCode Tool stays in front.
- Text Color: Select the timecode display text color. You can select from five presets, or set a custom color using the swatch on the right edge.
- BG Color: Select the background color. You can select from five presets, or set a custom color using the swatch on the right edge.
Display modes can also be switched with shortcuts when INT TimeCode Tool has focus.
4= Timeline TC5= Dual6= Converted

- Timeline TC: Displays the DaVinci Resolve Timeline TC as-is. Use this when you want to check the TC used as the editing position reference.
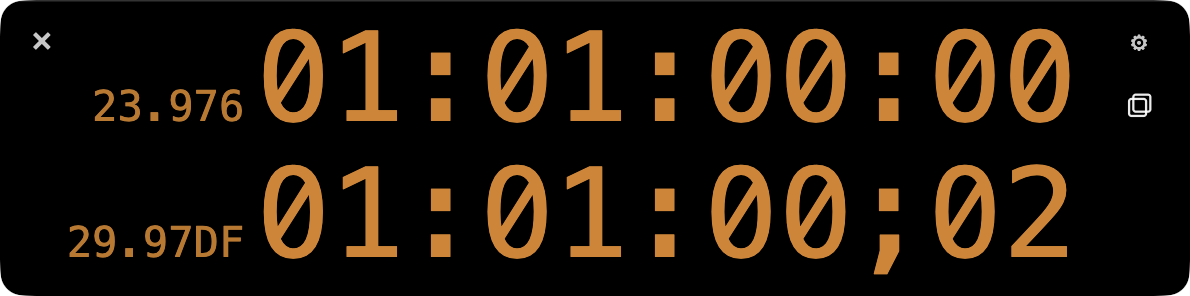
- Dual: Displays Timeline TC and Converted TC side by side. Use this when you want to check the pull-down converted TC while looking at the DaVinci Resolve Timeline TC.

- Converted: Displays the converted TC at the center. Use this when editing at 23.976fps and checking TC for 29.97DF / 59.94DF.
Network Tools
Network Tools are settings related to Timeline TC Monitoring. Details are explained in 6. Timeline TC Monitoring.
5.3 Displaying TC on Video with INT_BurnIn
If you want to display the TC shown in INT TimeCode Tool on the DaVinci Resolve video as well, use INT_BurnIn (Fusion Title).
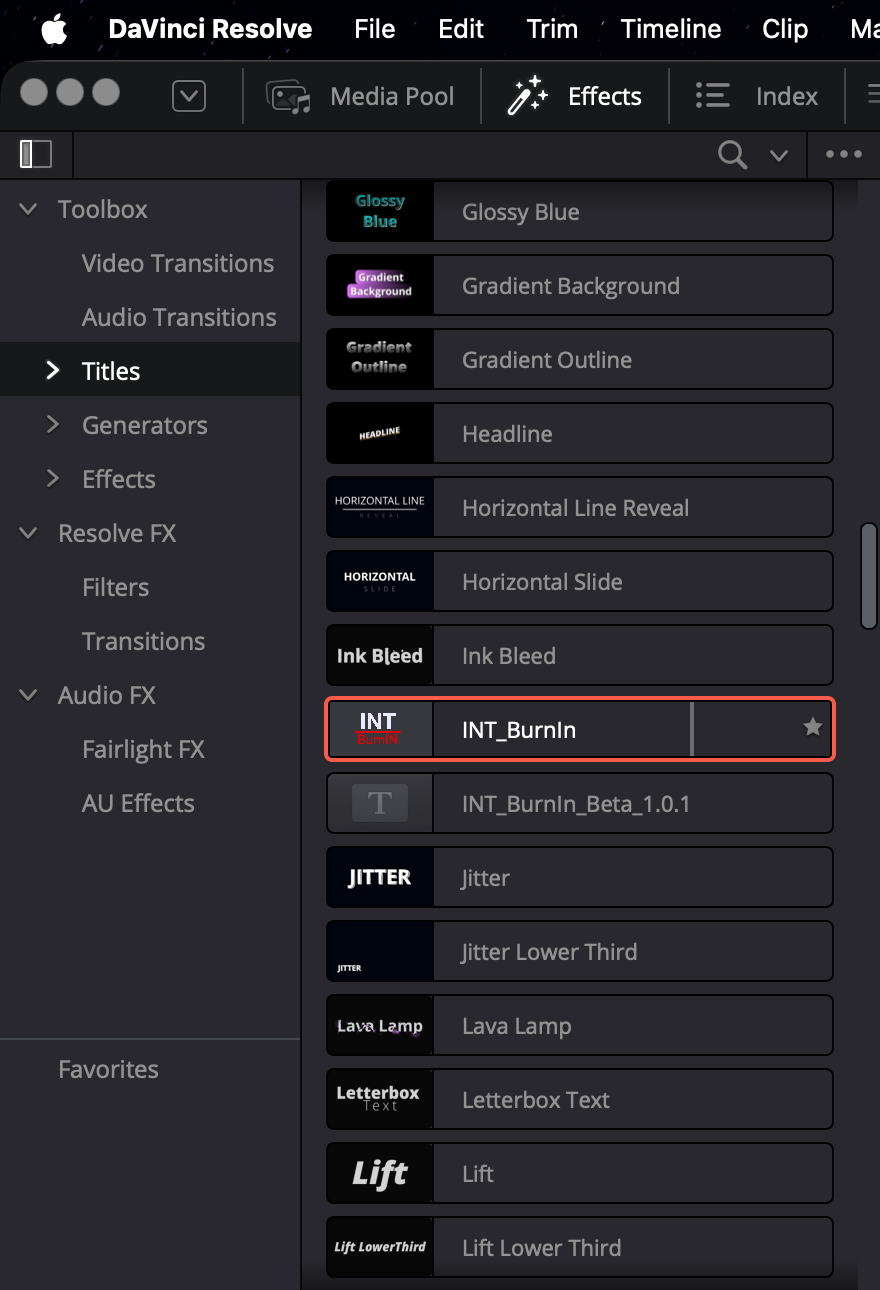
Place it on the DaVinci Resolve timeline as a Fusion Title, and adjust the display contents as needed. Select INT_BurnIn from the Titles category in Effects and place it on an upper track in the timeline.
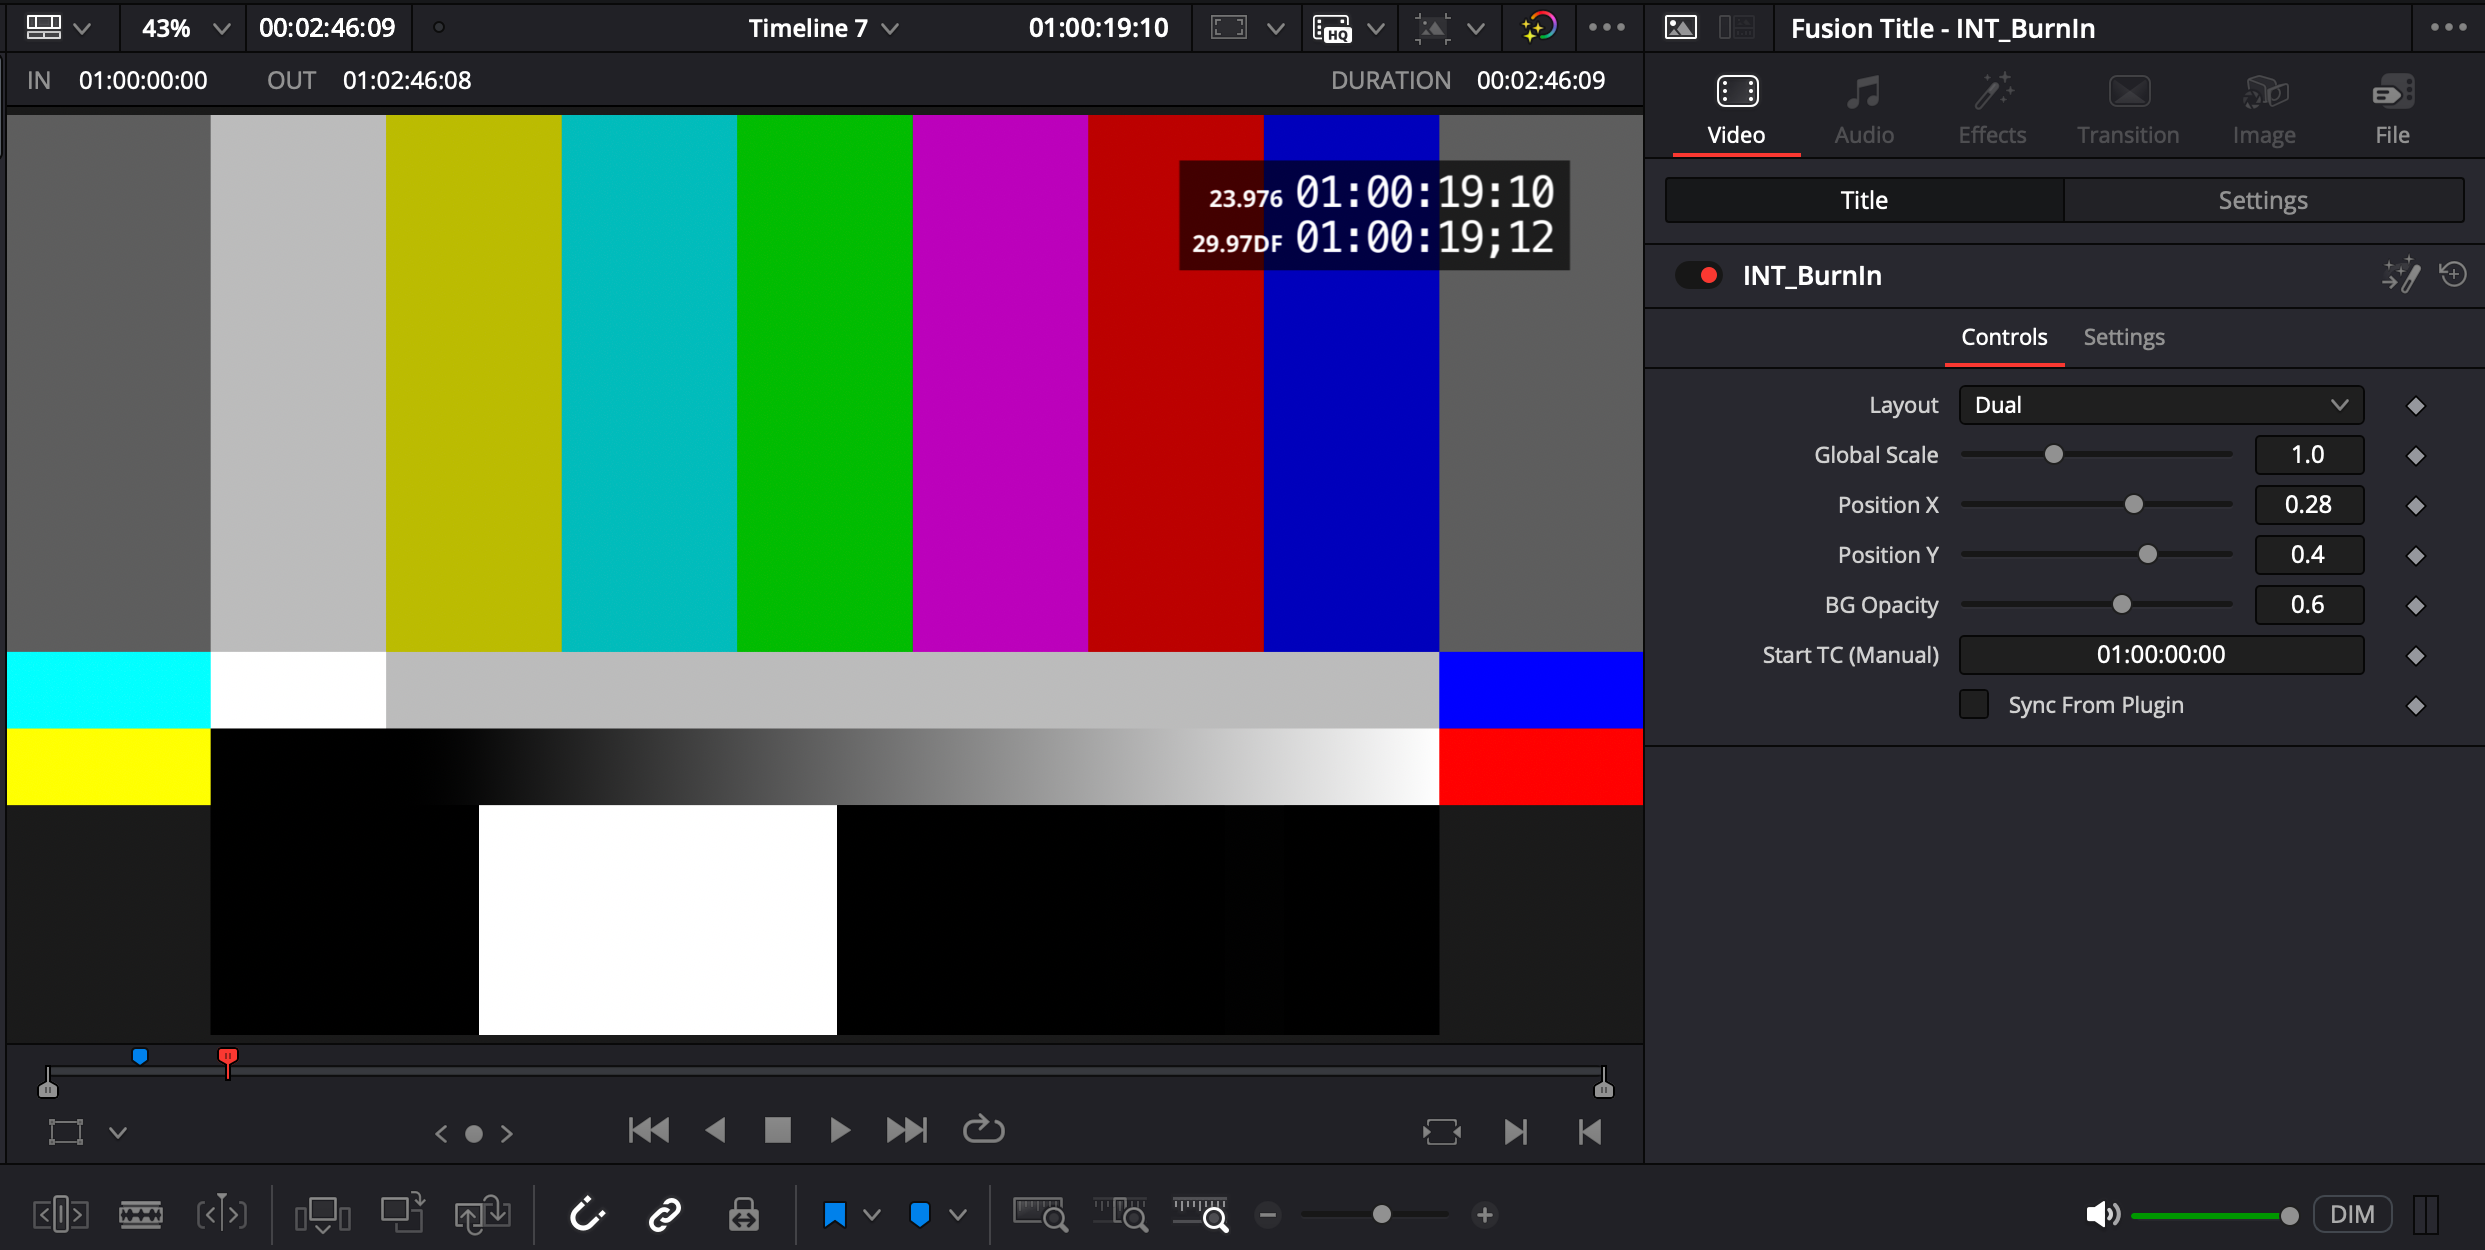
INT_BurnIn is displayed relative to the upper right of the video. You can adjust the display mode, size, and other settings from the Inspector.
- Layout: Select the display format from Timeline TC / Dual / Converted / Horizontal Dual. This can be set independently from the INT TimeCode Tool display mode.
- Global Scale: Adjusts the display size.
- Position X: Adjusts the horizontal position.
- Position Y: Adjusts the vertical position.
- BG Opacity: Adjusts the background opacity.
- Start TC (Manual): Manually specifies the start timecode used as the reference for the BurnIn display when Sync From Plugin is not used.
- Sync From Plugin: Applies the timeline start TC and display settings from INT TimeCode Tool as of the time the Settings screen is opened. If you change the timeline start TC or related display settings, open the INT TimeCode Tool Settings screen, then turn Sync From Plugin on in INT_BurnIn, or toggle it off and on if needed.
During installation, INT NLE Tools removes older INT_BurnIn files and installs the current INT_BurnIn. If the older INT_BurnIn_Beta_1.0.1 is present, it is also removed during installation. For uninstalling, see 10. Uninstall.
5.4 Controlling DaVinci Resolve Playback from INT TimeCode Tool
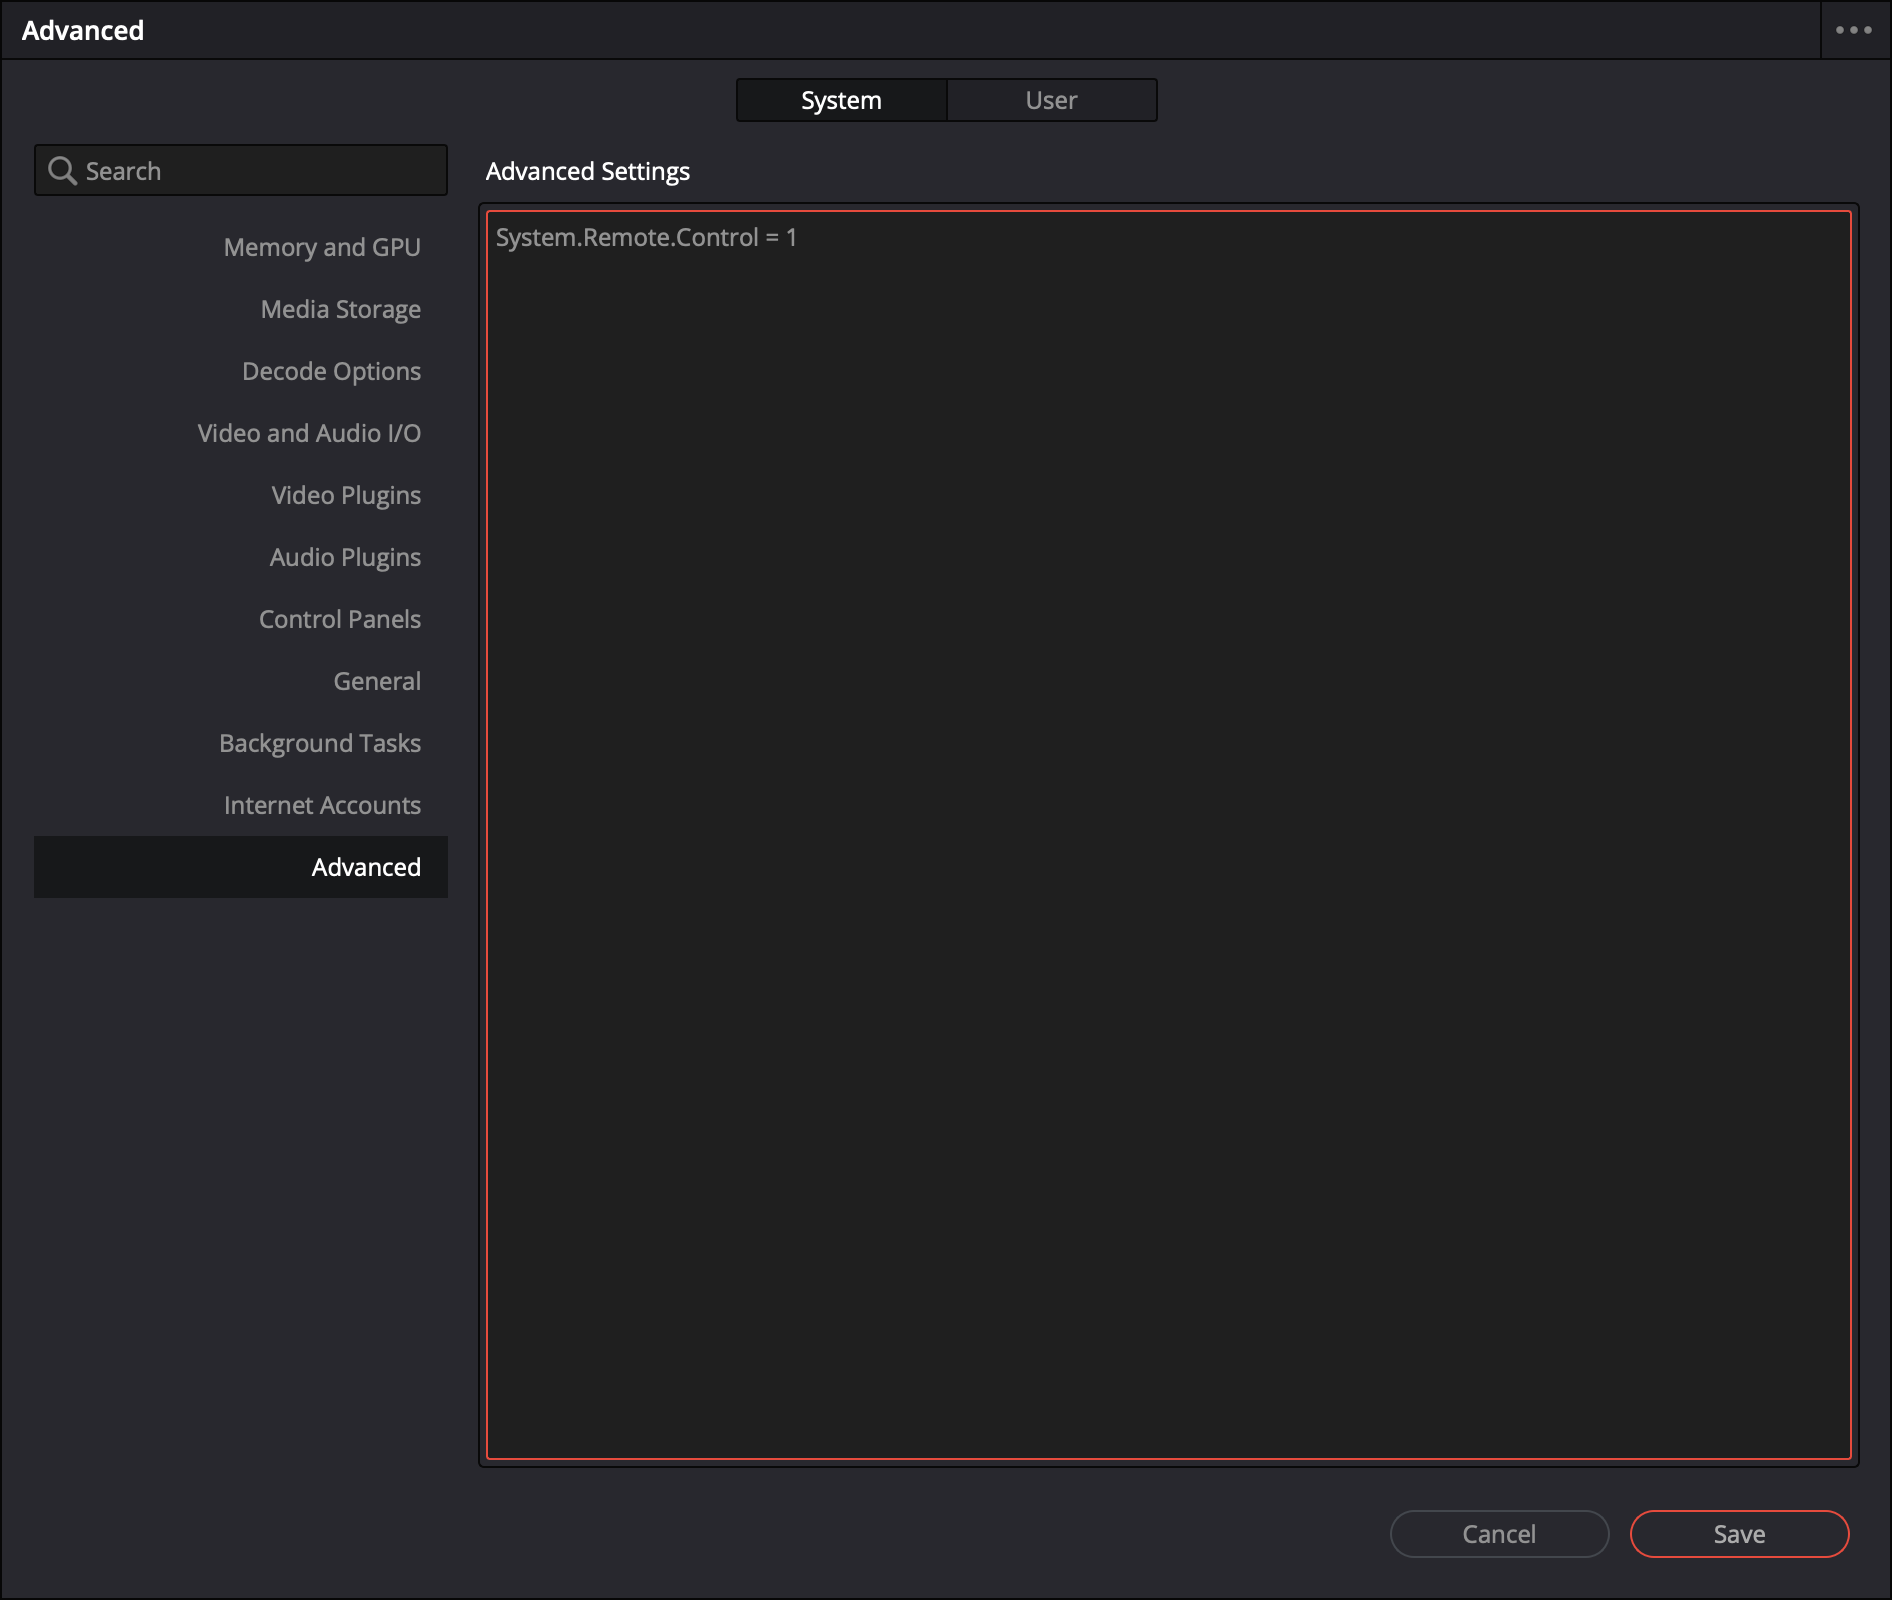
Immediately after launch or after changing settings, INT TimeCode Tool may have focus, so DaVinci Resolve shortcuts cannot be used.
In DaVinci Resolve Preferences / System / Advanced, enter System.Remote.Control = 1, save, and restart. This allows playback/stop control from INT TimeCode Tool using the space key.
6. Timeline TC Monitoring
You can check the NLE Timeline TC in a browser on a tablet, computer, or other device on the same network.
6.1 Sender -> Server -> Receiver Flow
TC from the NLE is transferred in the order Sender, Server, Receiver.
Sender
The Sender sends the current Timeline TC from the NLE. In DaVinci Resolve, INT TimeCode Tool acts as the Sender. In Premiere, INT TC Sender for Premiere acts as the Sender.
Server
The Server relays TC and display state received from the Sender to Receiver. INT TC Server acts as the Server.
Receiver
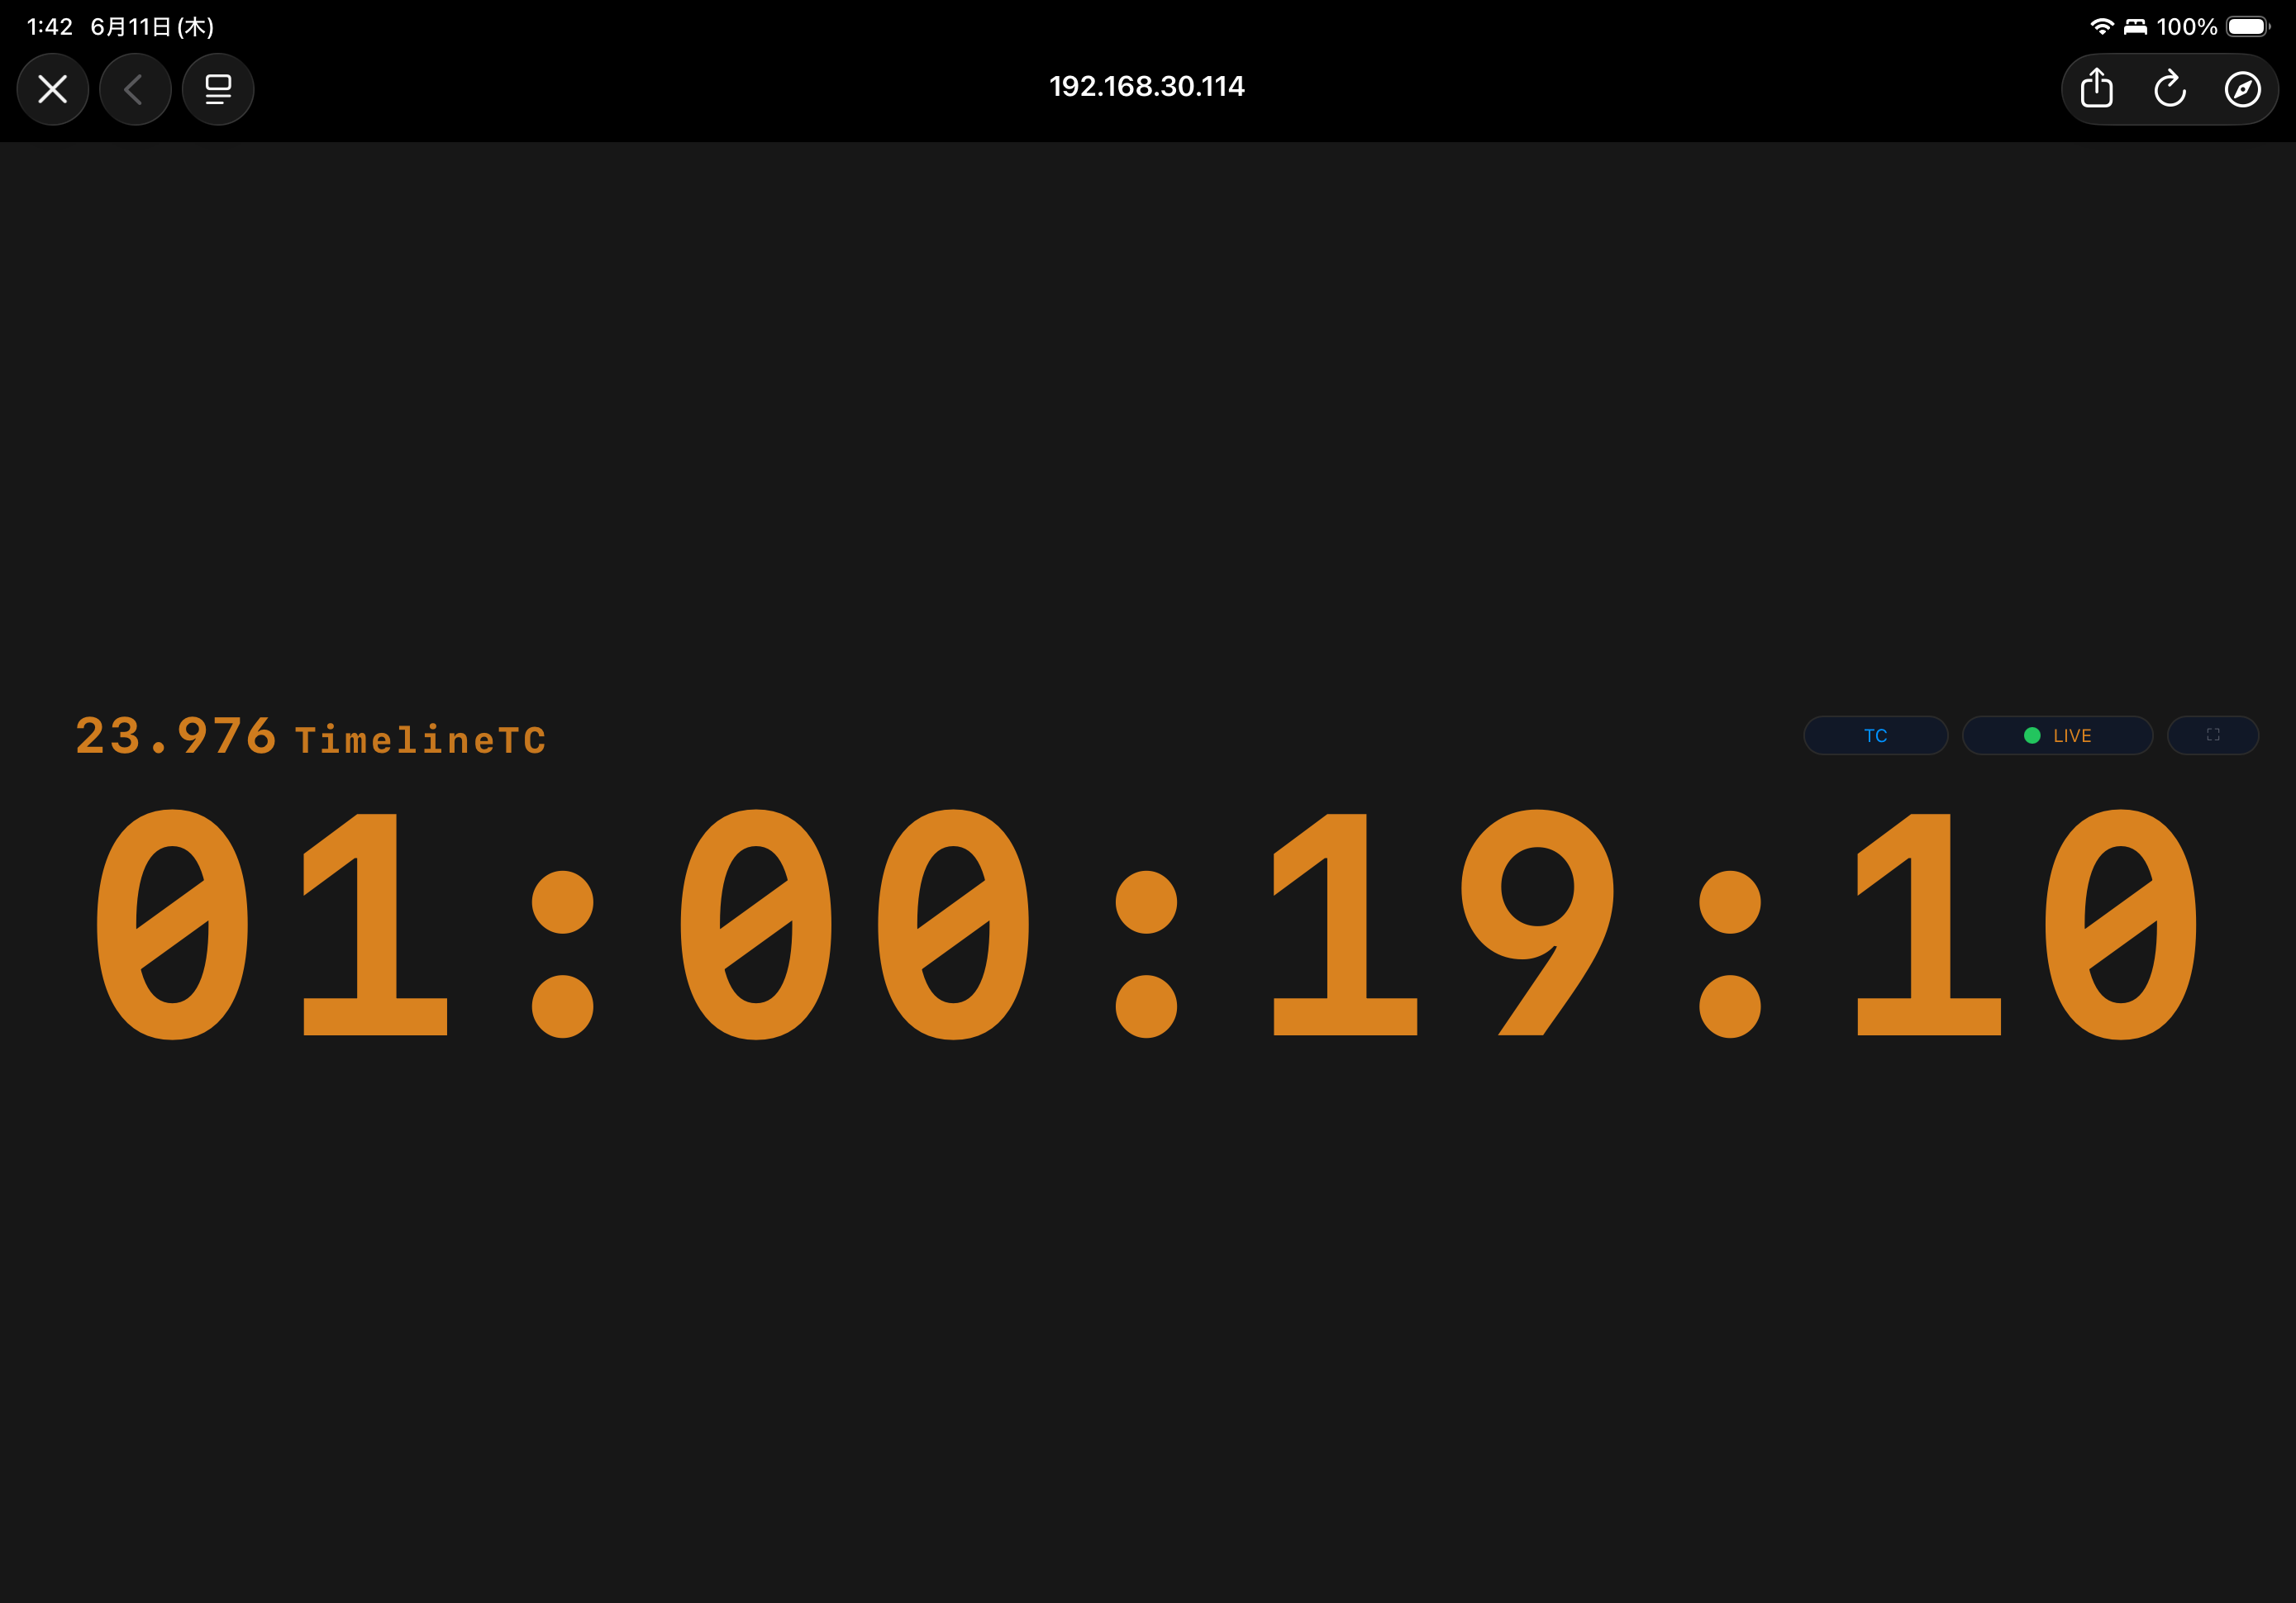
Receiver displays TC by accessing the web server inside INT TC Server from a browser on each device.
6.2 Displaying Timeline TC in Receiver with TC Mode
Launch INT TC Server.
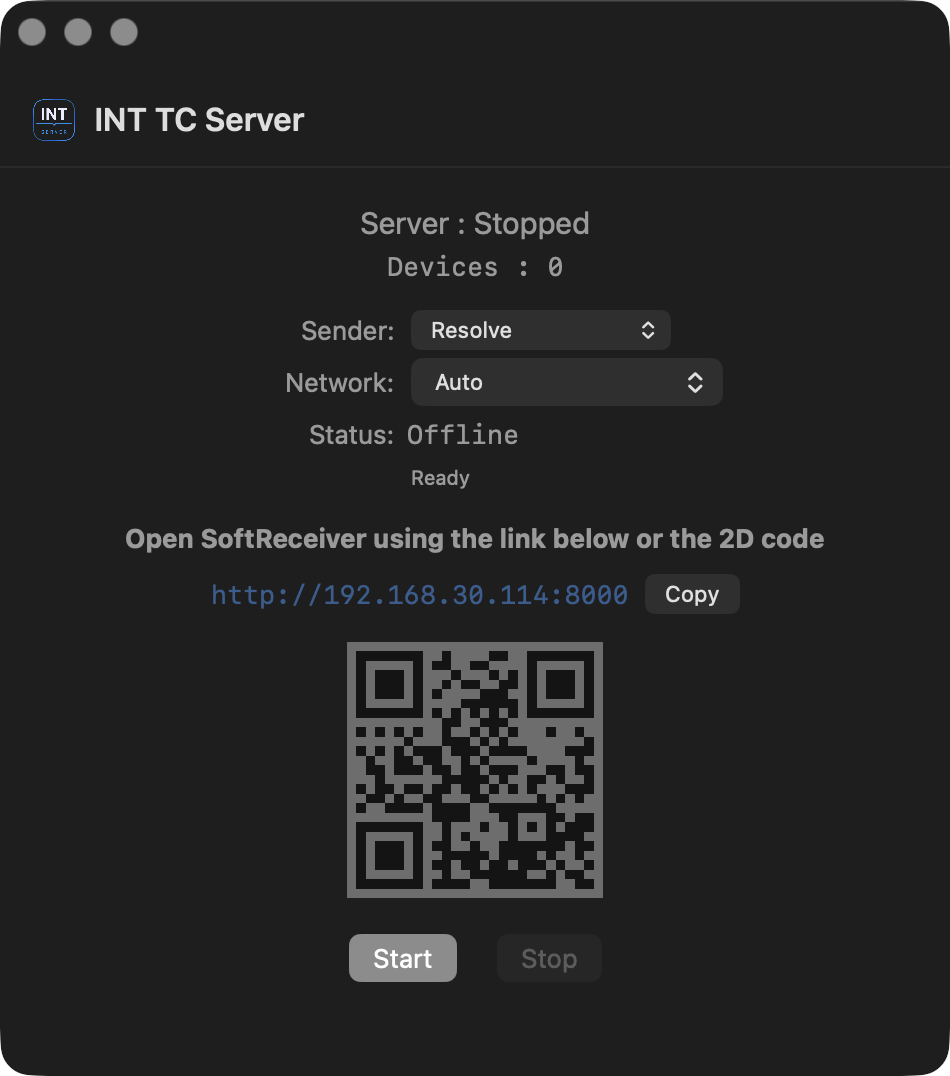
Press the start button to start the Server function.
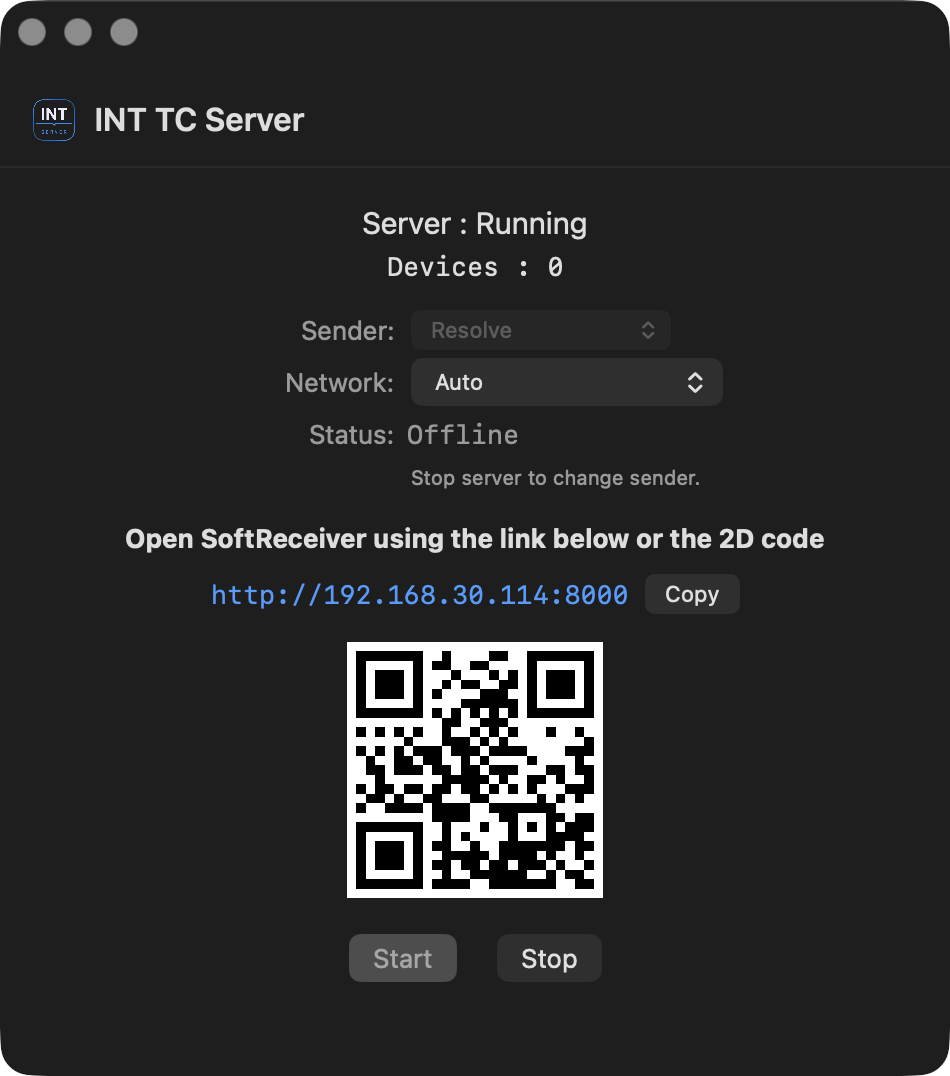
Access the displayed URL or QR code from a browser to display Receiver.
Network / LAN URL selection
In environments with multiple network interfaces, use the Network menu in INT TC Server to select the interface that is on the same network as the Receiver device.
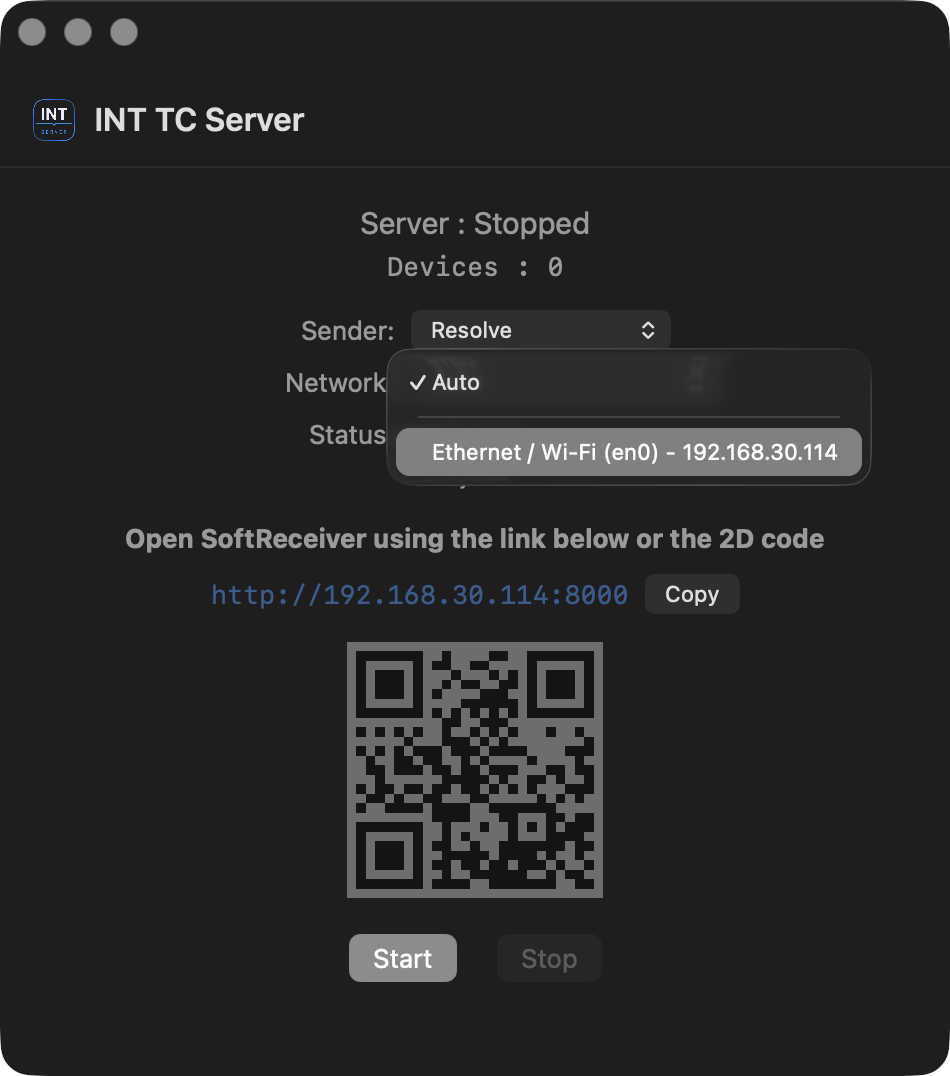
When you open the Network menu, you can check the interface name and IP address. The LAN URL is updated according to the selected interface, and the QR code is automatically updated to match the selected LAN URL.
To share the currently displayed Receiver URL manually, use the Copy button to copy it to the clipboard.
This setting does not change the address that INT TC Server listens on. It only selects the LAN URL and QR code shown to the user for Receiver access. If the URL does not open, check that the Receiver device is connected to the same local network.
Note: If Receiver cannot connect to INT TC Server, device-to-device communication may not be allowed on the network being used, before any INT NLE Tools settings are involved.
An internet connection is not required for INT NLE Tools Timeline TC Monitoring. What is required is that the machine running INT TC Server and the Receiver device can communicate within the same local network.
In company, broadcast facility, or studio networks, device-to-device communication may be blocked by security settings, even if the devices are connected to wired LAN or Wi-Fi within the same facility. For example, wired LAN and Wi-Fi may be separated, a guest network may prohibit device-to-device communication, or communication may be restricted by firewall or VLAN settings.
If the Receiver device cannot access the INT TC Server URL or IP address, ask the network administrator whether device-to-device communication is allowed. If the existing company LAN or studio LAN cannot be used, we recommend preparing an independent local network for INT NLE Tools and connecting INT TC Server and the Receiver device to the same network.
Network design, security policies, firewall settings, VLAN configuration, Wi-Fi isolation settings, and similar facility-specific matters are outside the support scope of this tool.

When you turn Sender ON in INT TimeCode Tool, DaVinci Resolve TC is displayed in Receiver.
Receiver display mode switches in sync with the Layout setting in INT TimeCode Tool.
Receiver is the browser display screen built into INT TC Server. It can be opened not only in a browser on the same Mac, but also in a browser on a tablet, computer, or other device on the same network.
In Receiver, switch between TC Mode and Clip Mode. TC Mode is the basic display for checking Timeline TC / Dual / Converted.
When using INT TC Sender for Premiere and using TC from Premiere, stop the Server, choose Premiere from the pull-down menu, then press the start button to start the Server function.
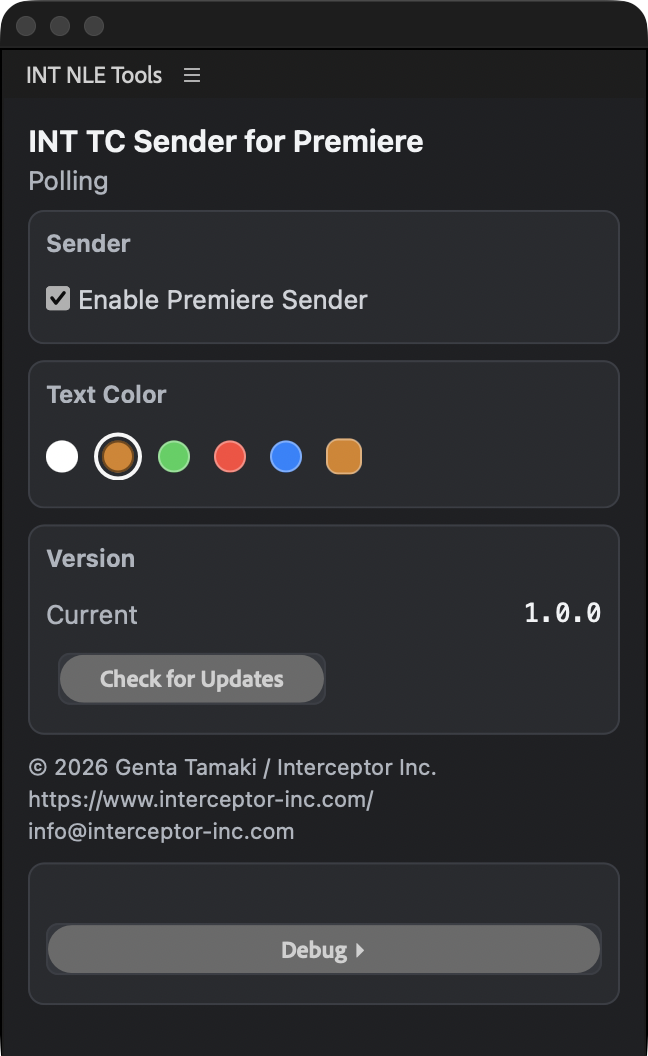
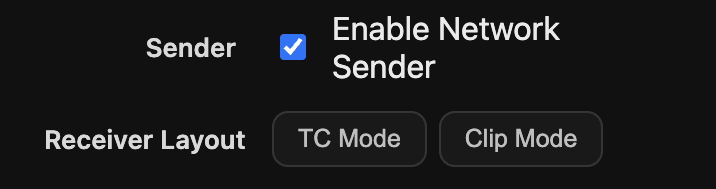
In Premiere, turn on the "Enable Premiere Sender" checkbox in INT TC Sender for Premiere to turn the Sender function ON. Receiver will then display Premiere TC.
6.3 Clip Mode
6.3.1 Displaying Metadata in Clip Mode
Clip Mode displays metadata at the stopped position when playback is stopped. In this version, it can display file name (File) / source frame number (Frame) / source timecode (SourceTC).
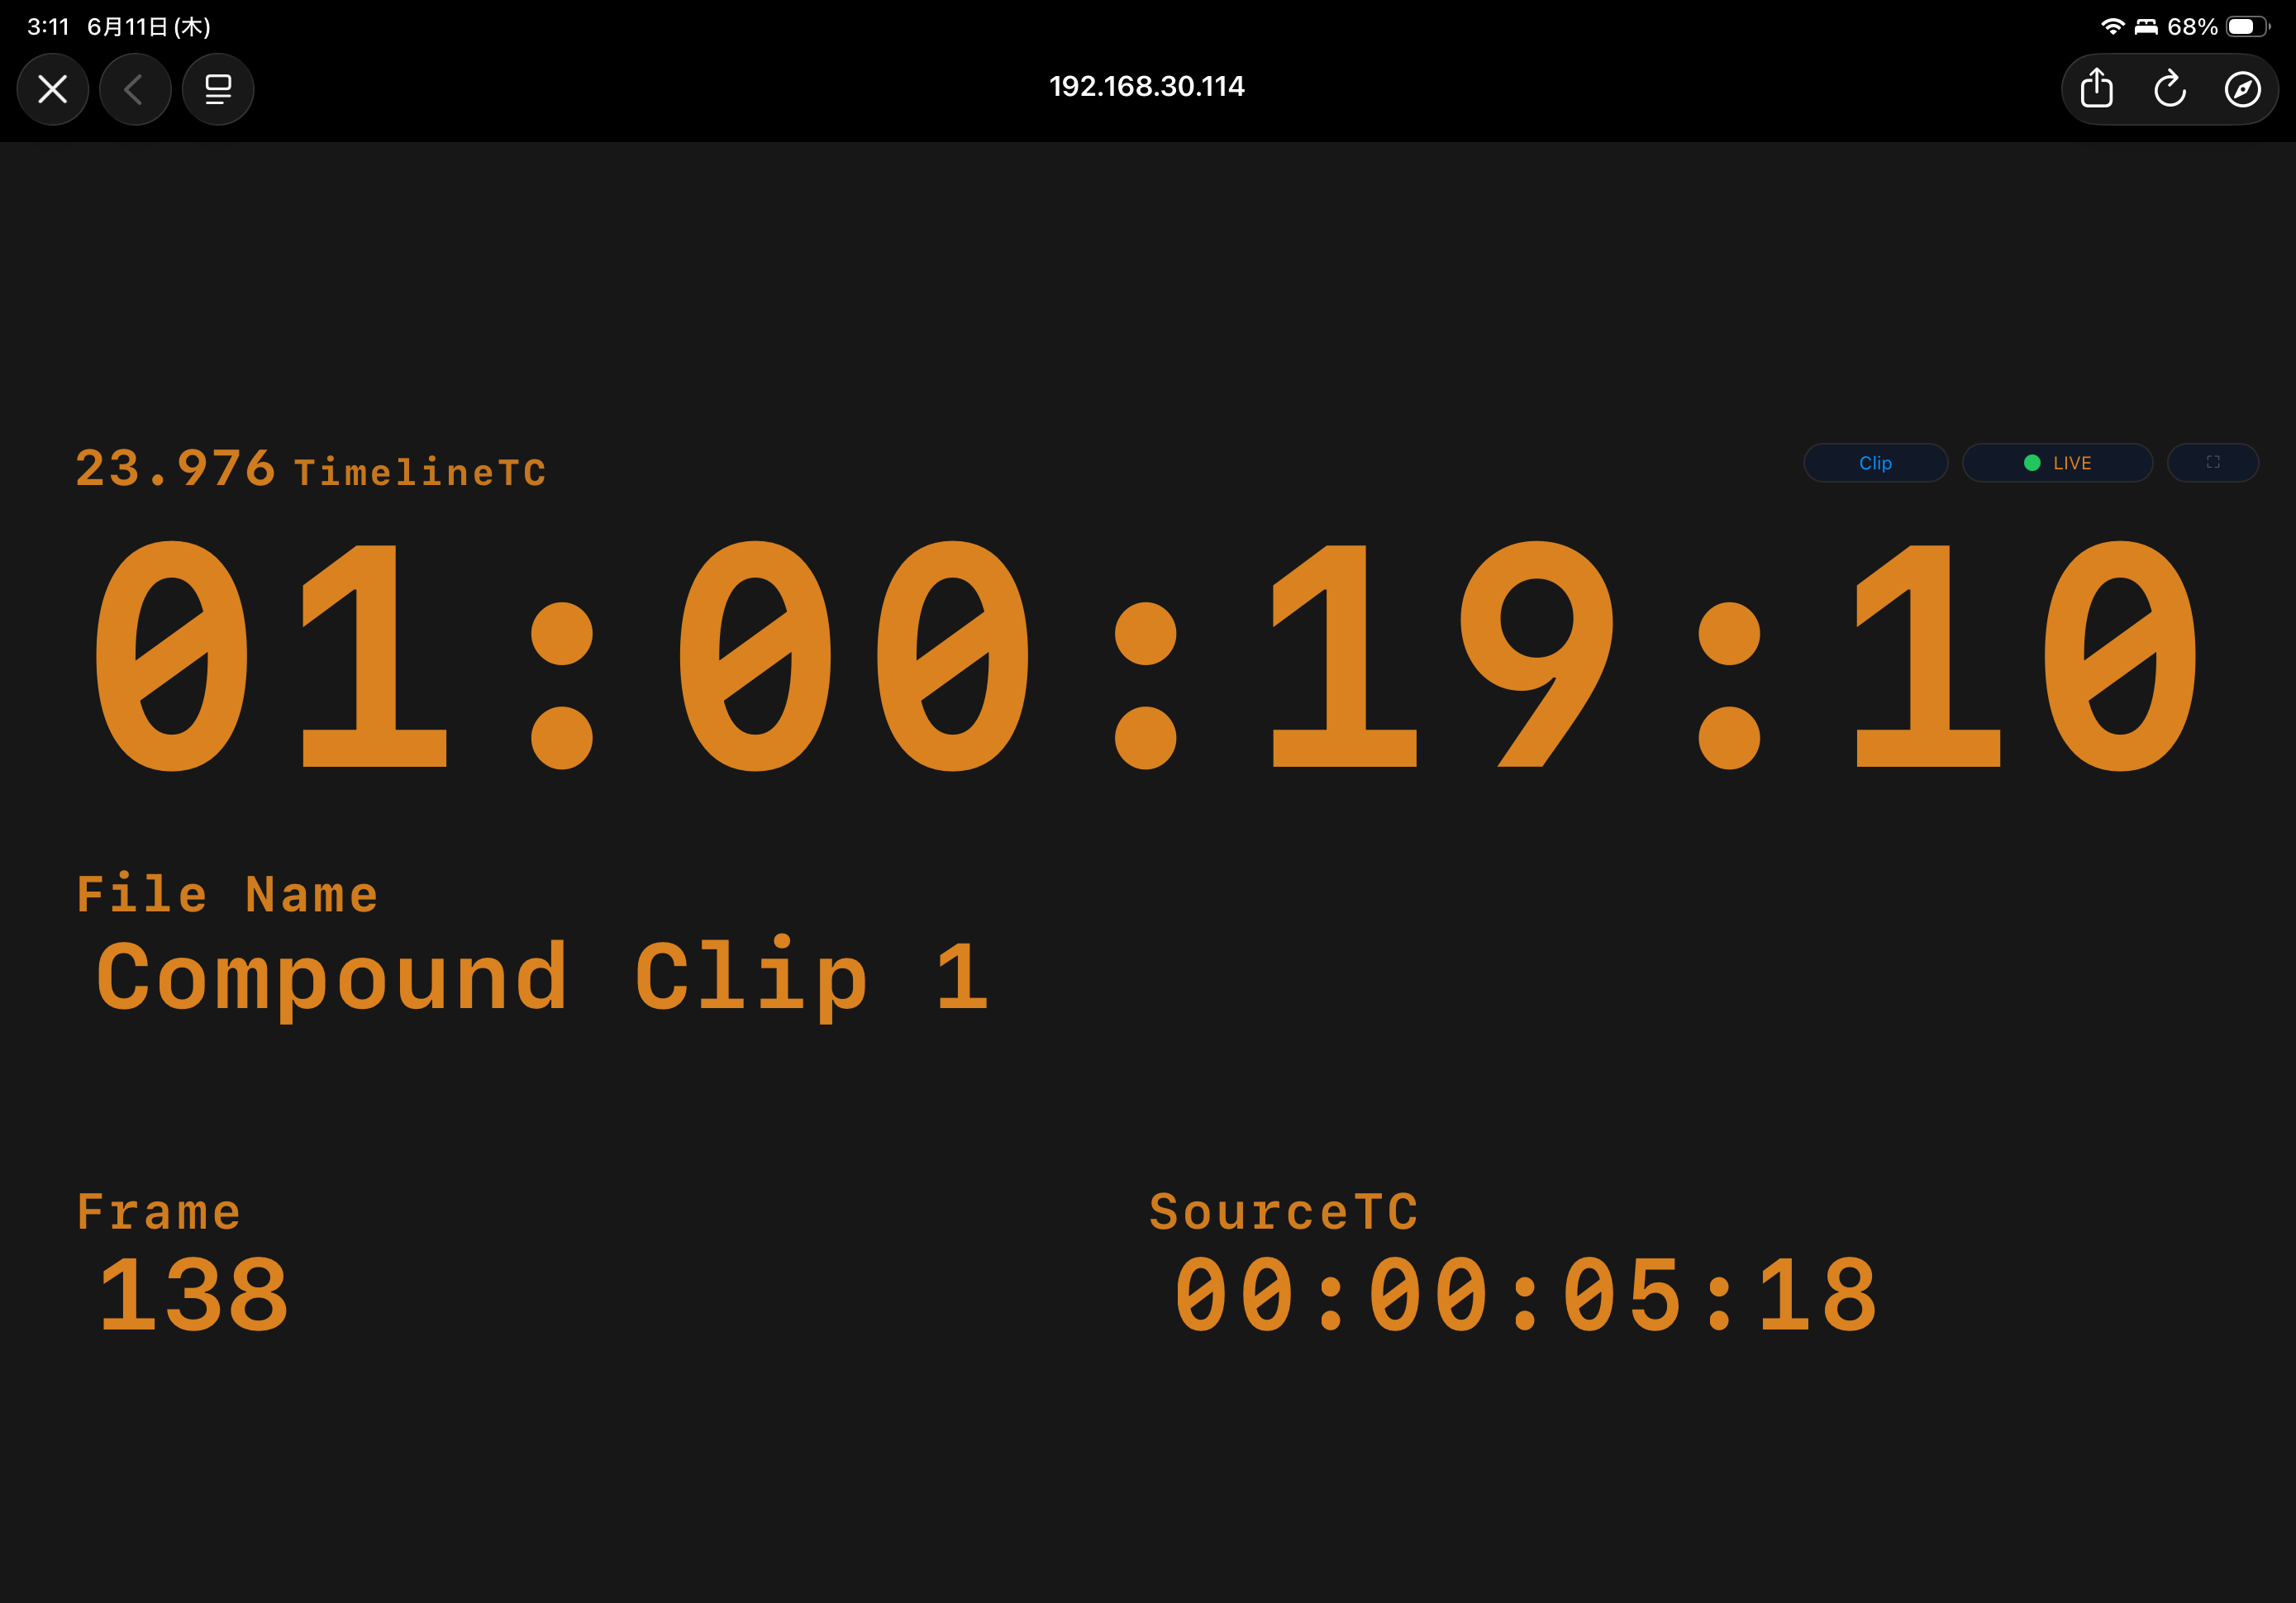
It is displayed by selecting Receiver Layout as Clip Mode in the INT TimeCode Tool Settings screen.
In INT TimeCode Tool, the shortcut for switching to Clip Mode is 8. The shortcut for switching back to TC Mode is 7.
Clip Mode does not follow frame by frame during playback like TC display. During playback, the metadata fields display "-".
6.3.2 Metadata Source in Clip Mode
In the INT TimeCode Tool Settings screen, Metadata Source lets you limit which video tracks are used to obtain metadata displayed in Clip Mode.
Auto displays metadata from the enabled clip on the highest track at the playhead position. Disabled clips, Generators, and similar items are skipped.
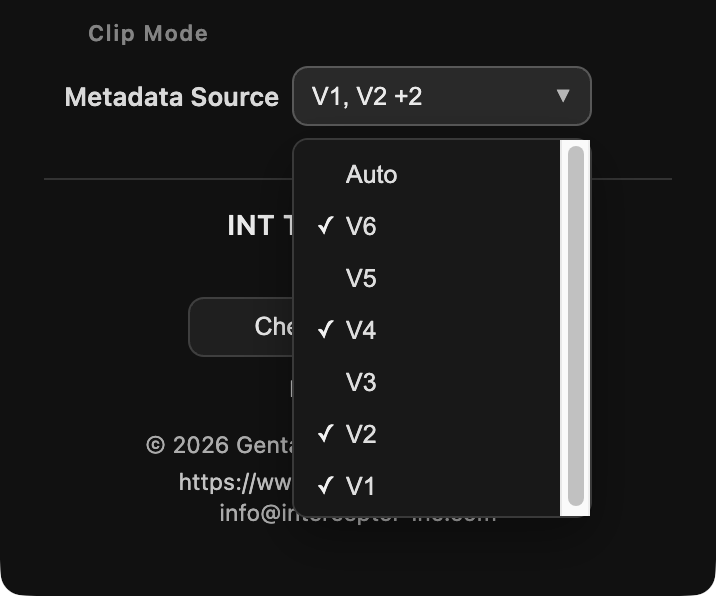
When you check specific tracks such as V1 / V2 from the pull-down menu, only clips on the specified video tracks are used as metadata display targets. Disabled clips, Generators, and similar items are also skipped in this case.
7. INT TC Sender for Premiere
7.1 What is INT TC Sender for Premiere?
INT TC Sender for Premiere is a plug-in for sending Timeline TC from Premiere to INT TC Server / Receiver. It supports Receiver TC Mode only.
7.2 UXP and CEP Versions
There are UXP and CEP versions depending on the Premiere version.
UXP version
Premiere 25.6 or later
CEP version
Premiere 2024-2025.5
Adobe has announced its intention to discontinue CEP plug-ins in the future. For this plug-in as well, future version updates will only be for the UXP version, except for critical fixes.
7.3 Installation
Two versions of INT TC Sender for Premiere are placed in
/Applications/INT NLE Tools/Resources/Sender for Adobe Premiere.
UXP version
Double-click INT TC Sender for Premiere.ccx in UXP - Premiere 25.6 or later. Creative Cloud Desktop will launch. Follow the application instructions to install.
CEP version
Install INT_Premiere_Sender_Legacy_CEP.zxp in Legacy CEP - Premiere 2024-2025.5 using an installer such as ZXPInstaller.
7.4 Basic Usage
- Launch INT TC Server.
- In INT TC Server, choose Premiere from the Sender pull-down menu, then press the start button to start the Server function.
- Open the URL or QR code shown in INT TC Server in a browser to display Receiver, and keep it open.
- Open INT TC Sender for Premiere in Premiere. (UXP version: Menu bar / Window / UXP Plugins / INT NLE Tools / INT TC Sender for Premiere / CEP version: Menu bar / Window / Extensions / INT TC Sender Legacy)
- In Premiere, turn on the "Enable Premiere Sender" checkbox in INT TC Sender for Premiere to turn the Sender function ON.
- Confirm that Timeline TC is displayed in Receiver.
You can change the TC text color in Receiver from the Text Color setting. Select from five preset colors, or set a custom color using the swatch on the right edge.
After turning on the Sender function, TC transmission continues even if you close the INT TC Sender for Premiere window. Configure it again after restarting Premiere.
8. Migrating from INT TimeCode Tool v1.0.1
8.1 Positioning of INT TimeCode Tool v1.0.1 and INT NLE Tools v1.0
INT TimeCode Tool v1.0.1 was provided mainly as a standalone tool for DaVinci Resolve. INT NLE Tools v1.0 includes it as INT TimeCode Tool v1.2.
INT NLE Tools v1.0 for macOS is a suite that includes INT TimeCode Tool, INT TC Server, Receiver, INT TC Sender for Premiere, INT_BurnIn, Uninstaller, and other components. With INT TimeCode Tool v1.2, in addition to Pull-down TC Display for checking TC in DaVinci Resolve, you can use Timeline TC Monitoring to check Timeline TC on external devices.
8.2 Preserving a v1.0.1 Environment
If you want to continue using INT TimeCode Tool v1.0.1, or keep the option to return to it as needed, we recommend that you preserve the old download links, installers, and distribution files that you already have before migrating. INT NLE Tools does not guarantee that old v1.0.1 distribution files will be provided again.
8.3 Mixing Old and New Versions
In principle, we recommend not mixing the old standalone INT TimeCode Tool and the new INT NLE Tools version in the same environment. This may cause unexpected behavior in DaVinci Resolve.
8.4 Returning to v1.0.1
To return to INT TimeCode Tool v1.0.1, first uninstall INT NLE Tools, then return using the v1.0.1 distribution files you have preserved yourself. See Chapter 10 for uninstalling.
8.5 About INT_BurnIn (Fusion Title)
INT_BurnIn is removed by the INT NLE Tools uninstaller. If the older INT_BurnIn_Beta_1.0.1 is present, it is also removed during uninstall.
9. Known Limitations
Clip Mode
Depending on the environment, Clip Mode may briefly show a waiting state for interpolation startup immediately after playback starts. TC display and interpolation then operate normally.
INT TC Sender for Premiere
INT TC Sender for Premiere is the Premiere Sender for Timeline TC Monitoring. This version does not support Clip Mode.
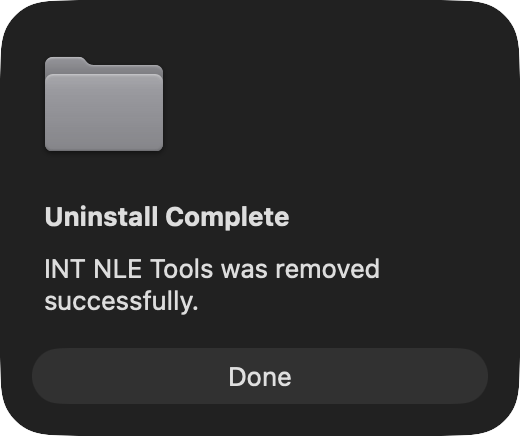
10. Uninstall
10.1 Before Uninstalling
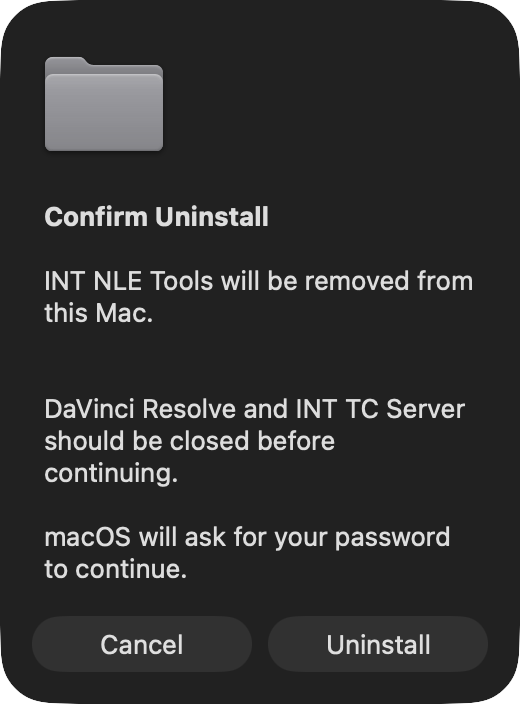
Before starting, quit DaVinci Resolve, INT TC Server, and any browser displaying Receiver.
Uninstall INT TC Sender for Premiere from Creative Cloud Desktop.
10.2 Standard Uninstall
Launch /Applications/INT NLE Tools/Uninstall INT NLE Tools.app, or launch Uninstall INT NLE Tools.app in the installer DMG.
Follow the instructions in the window.
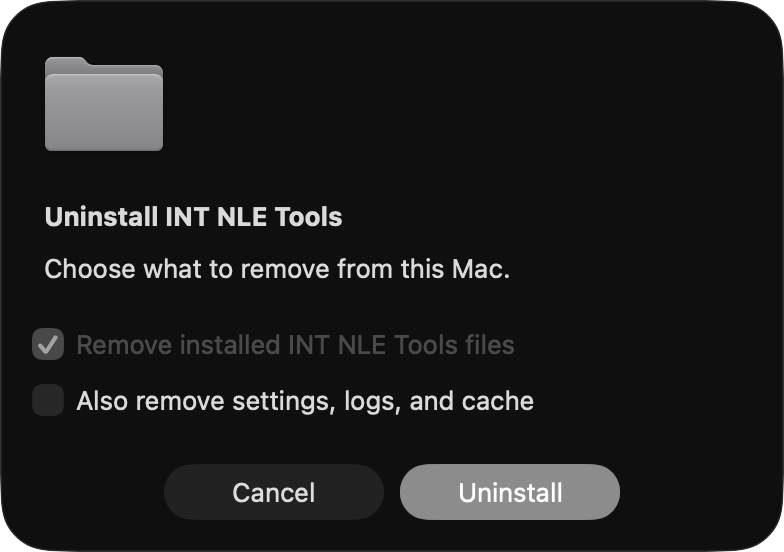
10.3 Optional Cleanup
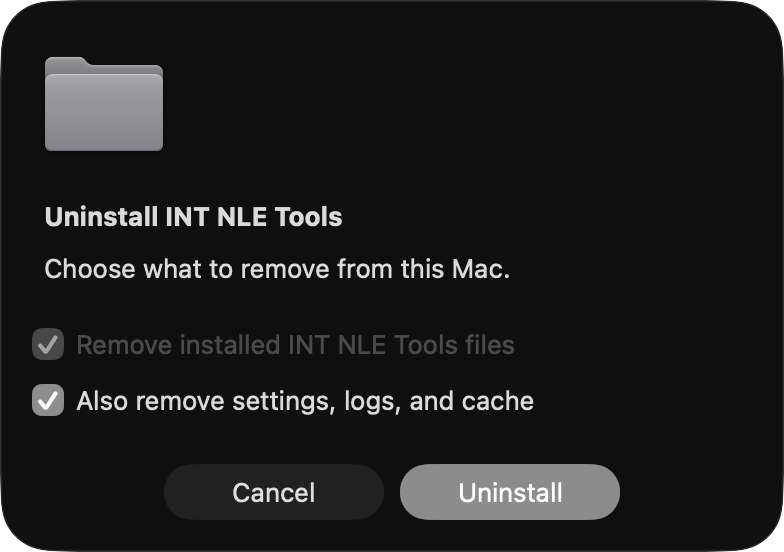
If you enable the "Delete settings, logs, and cache as well" checkbox, settings and cache files remaining on the system will also be removed. Select this option as needed.
11. Rights Notices and License
11.1 Third-Party Products and Trademarks
INT NLE Tools is a set of tools intended for use together with video production software such as DaVinci Resolve and Adobe Premiere.
The names Blackmagic Design, DaVinci Resolve, Adobe, Adobe Premiere, and other names appearing in this document are trademarks or registered trademarks of their respective owners. These names are used only to describe supported software and operating environments.
INT NLE Tools is not developed, endorsed, warranted, or provided by Blackmagic Design Pty. Ltd., Adobe Inc., or any other third-party company. All rights related to each company's product names, logos, trademarks, and software belong to their respective rights holders.
11.2 Rights to INT NLE Tools
Unless otherwise stated, copyright and related rights in INT NLE Tools, including each tool, related file, settings file, script, installer, and other materials created by Interceptor Inc. that make up this software, belong to Interceptor Inc.
Unless otherwise stated, rights in the text, structure, and explanatory materials independently created by us for this document belong to Interceptor Inc. However, screenshots and other materials included in this document may contain screens, names, logos, user interfaces, and other elements of third-party products in which third parties hold rights. Those rights belong to their respective rights holders.
Use this software under the license terms included with or separately presented for the software. You may not use, copy, modify, redistribute, sell, lend, transfer, publish, or provide this software to any third party beyond the scope permitted by the license terms.
11.3 Permitted Use and Prohibited Actions
Use INT NLE Tools only within the scope of the permitted users, operating environments, and number of devices.
In particular, the following actions are prohibited.
- Copying, redistributing, selling, lending, or transferring this software without permission
- Installing this software on multiple devices or many machines beyond the scope permitted by the license
- Incorporating part or all of this software into services, distributions, or products for third parties without permission
- Removing or modifying rights notices, license notices, or copyright notices in this software
- Modifying, analyzing, reverse engineering, or redistributing this software or derivative works without permission, except where permitted by law
- Using this software in any form not permitted by the license terms
When installing this software on multiple devices in a studio, broadcast facility, post-production facility, educational institution, production company, or similar organization, confirm the permitted scope of use and license conditions in advance.
11.4 Disclaimer
INT NLE Tools is a tool for assisting video production workflows. Interceptor Inc. is not responsible, beyond the scope defined in the license terms, for project data, media files, edit data, deliverables, work time, business losses, or any other damages arising from use of this software.
Before using this software, users are responsible for creating backups of important project data and media files. Also, before using this software in a production environment, sufficiently verify its operation in the environment where it will be used.
This chapter provides an overview of rights and usage conditions. The official terms of use are governed by the license terms included with or separately presented for the software.