INT DCP Baker User Guide
Version: 1.0.4
1. Introduction
Cinema servers typically use media formatted as EXT3 or EXT2 to receive DCPs. INT DCP Baker creates a delivery disk image from DCP source material, writes that image to physical media, and automatically reads the written data back for verification.
In this guide, “image” means the delivery disk image, and “Bake” means writing that image to physical media.
1.1 PREP and BAKE
Work is divided into two stages: PREP, where the job is prepared, and BAKE, where the delivery media is created. In PREP, select the Work Folder, DCP Source, Target Media, and image creation method. In BAKE, review the job, write the media, and perform readback verification.
1.2 System Requirements
INT DCP Baker v1.0.4 supports Apple Silicon Macs running macOS 26 or later.
The application interface supports Japanese, English, Simplified Chinese, and Traditional Chinese, and follows the macOS language setting.
1.3 What You Need
- The DCP source material for delivery
- A Work Folder for images and job results
- Target Media whose entire contents may be erased
- An administrator account that can complete macOS authorization
- An internet connection for initial setup and license activation
The free space needed for a new image depends on the image size and the location of the Work Folder. Check Planned size, Free space, and any capacity guidance shown in PREP.
1.4 Before Starting Bake
Warning
Starting Bake erases all contents of the selected Target Media. This cannot be undone.
Confirm the name and capacity of the Target Media, and make sure you have not selected a drive that contains the DCP Source or Work Folder. Do not disconnect any drive used by the job until image creation, writing, and readback verification are complete.
If you are not certain about the target, do not start Bake. Return to PREP and select it again.
2. Installation and the Image Creation Environment
2.1 Installation
- Open the INT DCP Baker installer.
- Review the information shown by macOS Installer, then select Install.
- Complete macOS authorization.
- Confirm that installation is complete.
After installation, the INT DCP Baker folder in Applications contains Docs, INT DCP Baker, Runtime, and Uninstall INT DCP Baker.
2.2 Initial Setup
If the required environment is ready at launch, PREP appears directly. Image Creation Environment Setup appears only when setup is required.
- Select Start Setup.
- If macOS Installer or an authorization prompt appears, follow the onscreen instructions.
- Return to INT DCP Baker and confirm that setup is complete.
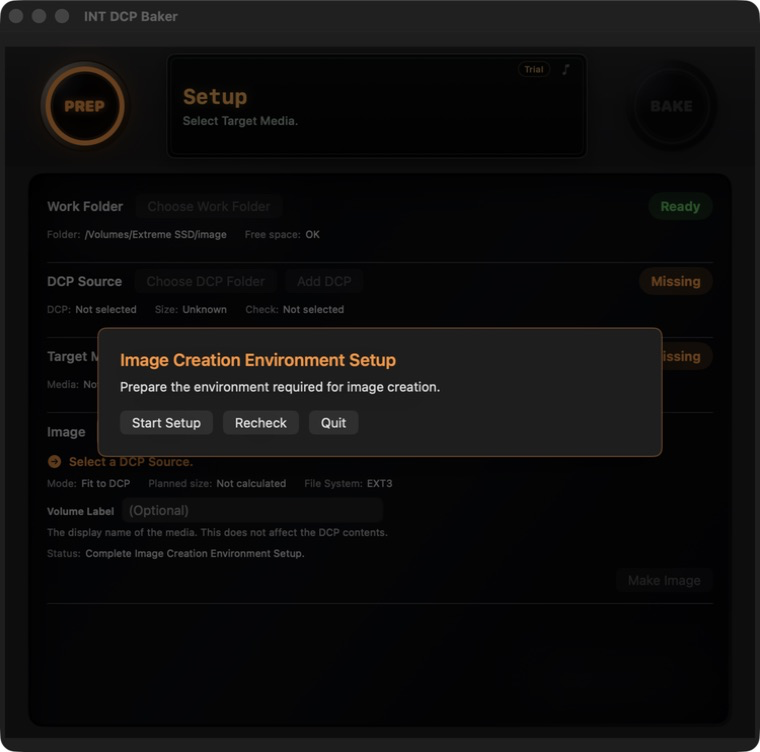
Setup continues automatically after the required system features have been confirmed. An internet connection may be required while macOS prepares the necessary components.
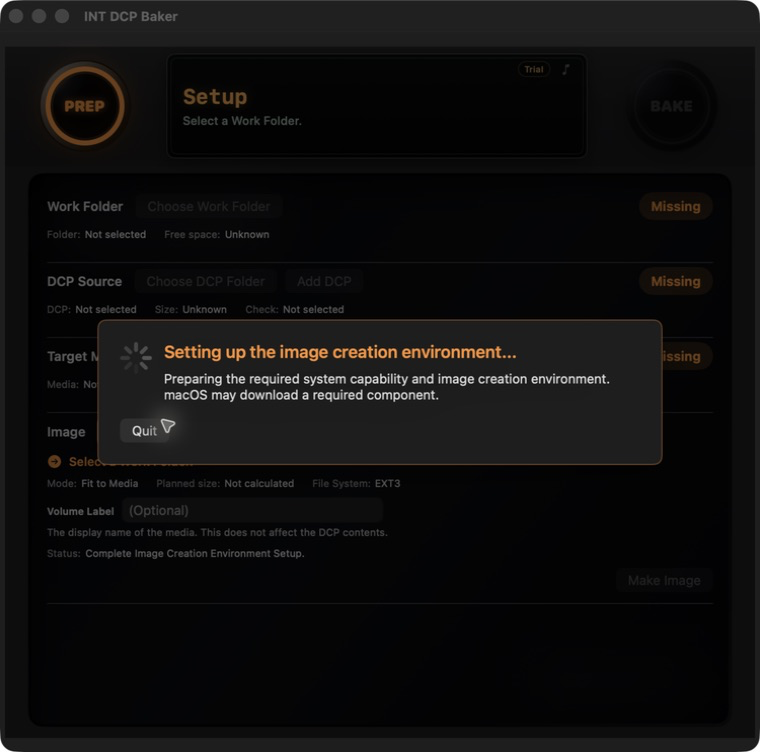
2.3 Setup Again and Errors
Setup may be required again after an update to the application, macOS, or a related runtime. Select Recheck to check again. If required files cannot be found, reinstall INT DCP Baker. If setup cannot be completed on a supported system, record the onscreen message and the time of the problem, then contact support.
3. Trial and License
3.1 Seven-Day Trial
All features are available for seven days from the first launch. The LCD shows Trial, while the License window shows status such as Trial: 7 days remaining.
When the Trial ends, the LCD shows Trial Expired. A license is required for continued use.
3.2 Activating a License
An internet connection is required for license activation.
- From the menu bar, open INT DCP Baker > License....
- Enter the license key and select Activate.
- Confirm License activation completed.
After activation, the status shows Licensed.
3.3 Continuing a Prepared Job After the Trial Ends
After the Trial ends, BAKE cannot start processing, but pressing BAKE opens the License window.
Opening the License window preserves the current valid preparation, including the Work Folder, DCP Source, Target Media, Image Workflow, and Volume Label. After the license is activated, BAKE can continue without rebuilding the job.
4. Settings
From the menu bar, open INT DCP Baker > Settings.... The default settings are suitable for normal use.
4.1 Updates
Use Check for updates at launch to enable or disable the startup check.
4.2 Notification Sounds
Play notification sounds is on by default. When it is on, successful completion plays a short completion sound and a processing failure plays the macOS system alert. Turning it off suppresses both sounds. Cancels, warnings, and intermediate phase transitions are silent regardless of this setting.
The same preference can be changed with the note button in the upper-right corner of the LCD. Settings and the LCD remain synchronized; the note is brighter when on and darker when off.
4.3 Image Size
Choose one of the following image sizes for the intended use.
- Fit to DCP — Determined from the DCP data and the space required by the file system
- Fit to Media — Determined from the capacity of the selected Target Media
- Custom — Created at the specified capacity
The default is Fit to Media. Fit to DCP may allow the target to be selected later, but the image cannot be written to media smaller than the completed image. With Fit to Media and Custom, check the required target capacity in PREP.
After changing this setting, check Planned size and the Work Folder's Free space again in PREP.
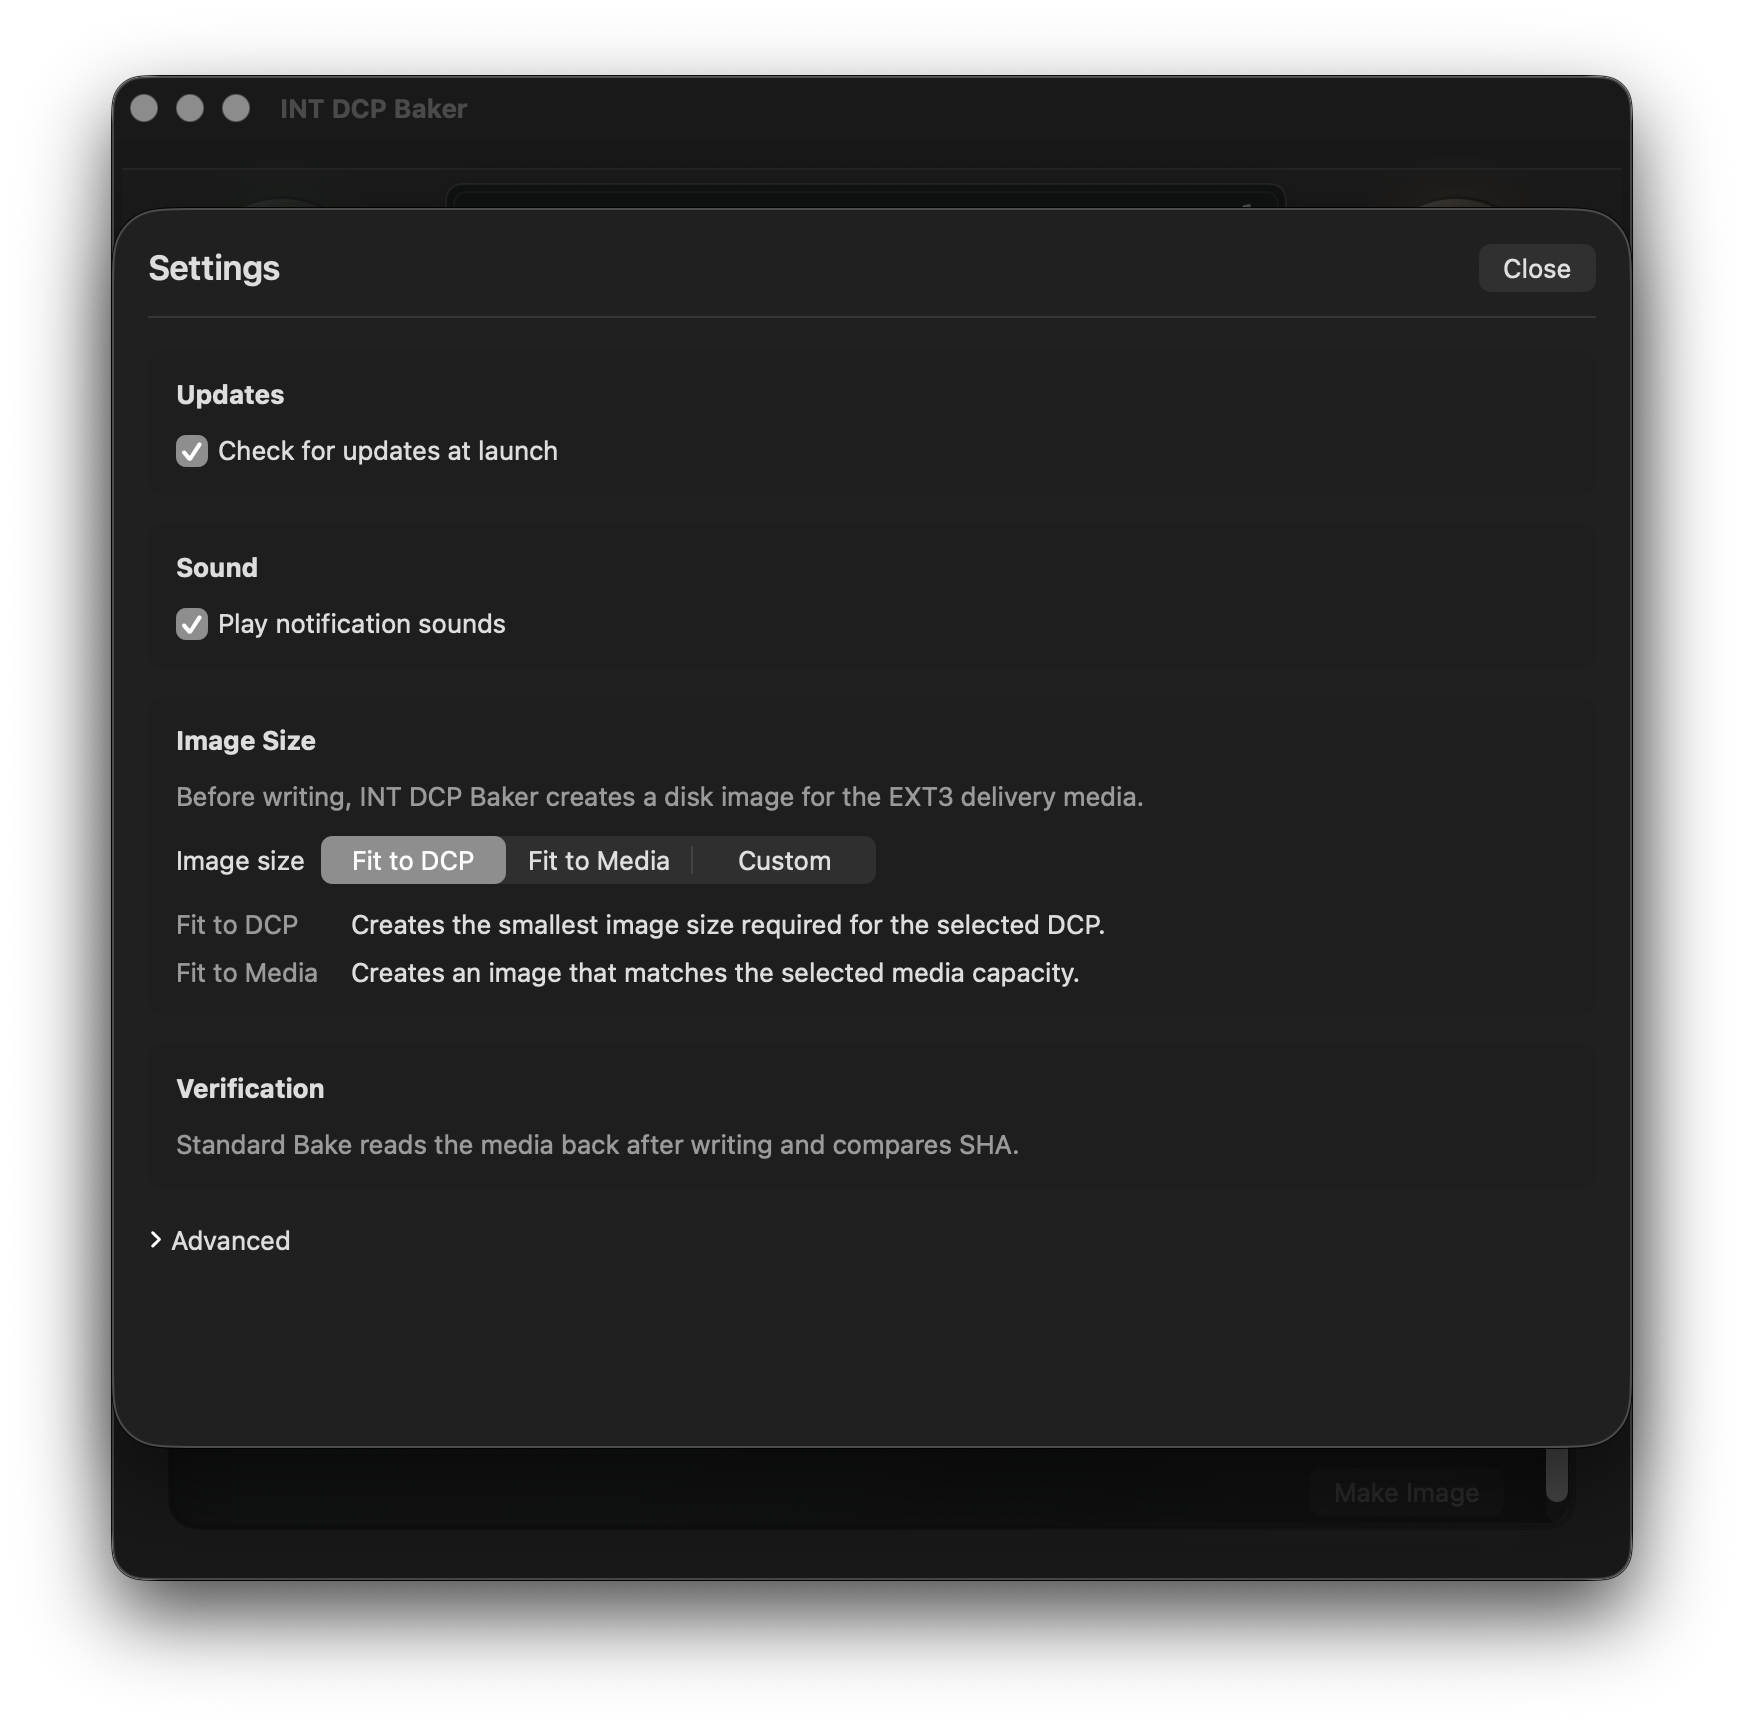
4.4 Write Verification
During a normal Bake, the application reads the media back after writing and compares the byte count and SHA-256. Readback verification is required to complete delivery media.
4.5 File System Format
- EXT3 Recommended — Use for normal delivery
- EXT2 Compatibility — Use only when the venue specifies EXT2
Changing this setting may make an existing image incompatible with the current selection. In that case, create the image again using the correct format.
5. Preparing a Delivery Job (PREP)
PREP is where the settings required to create delivery media are prepared.
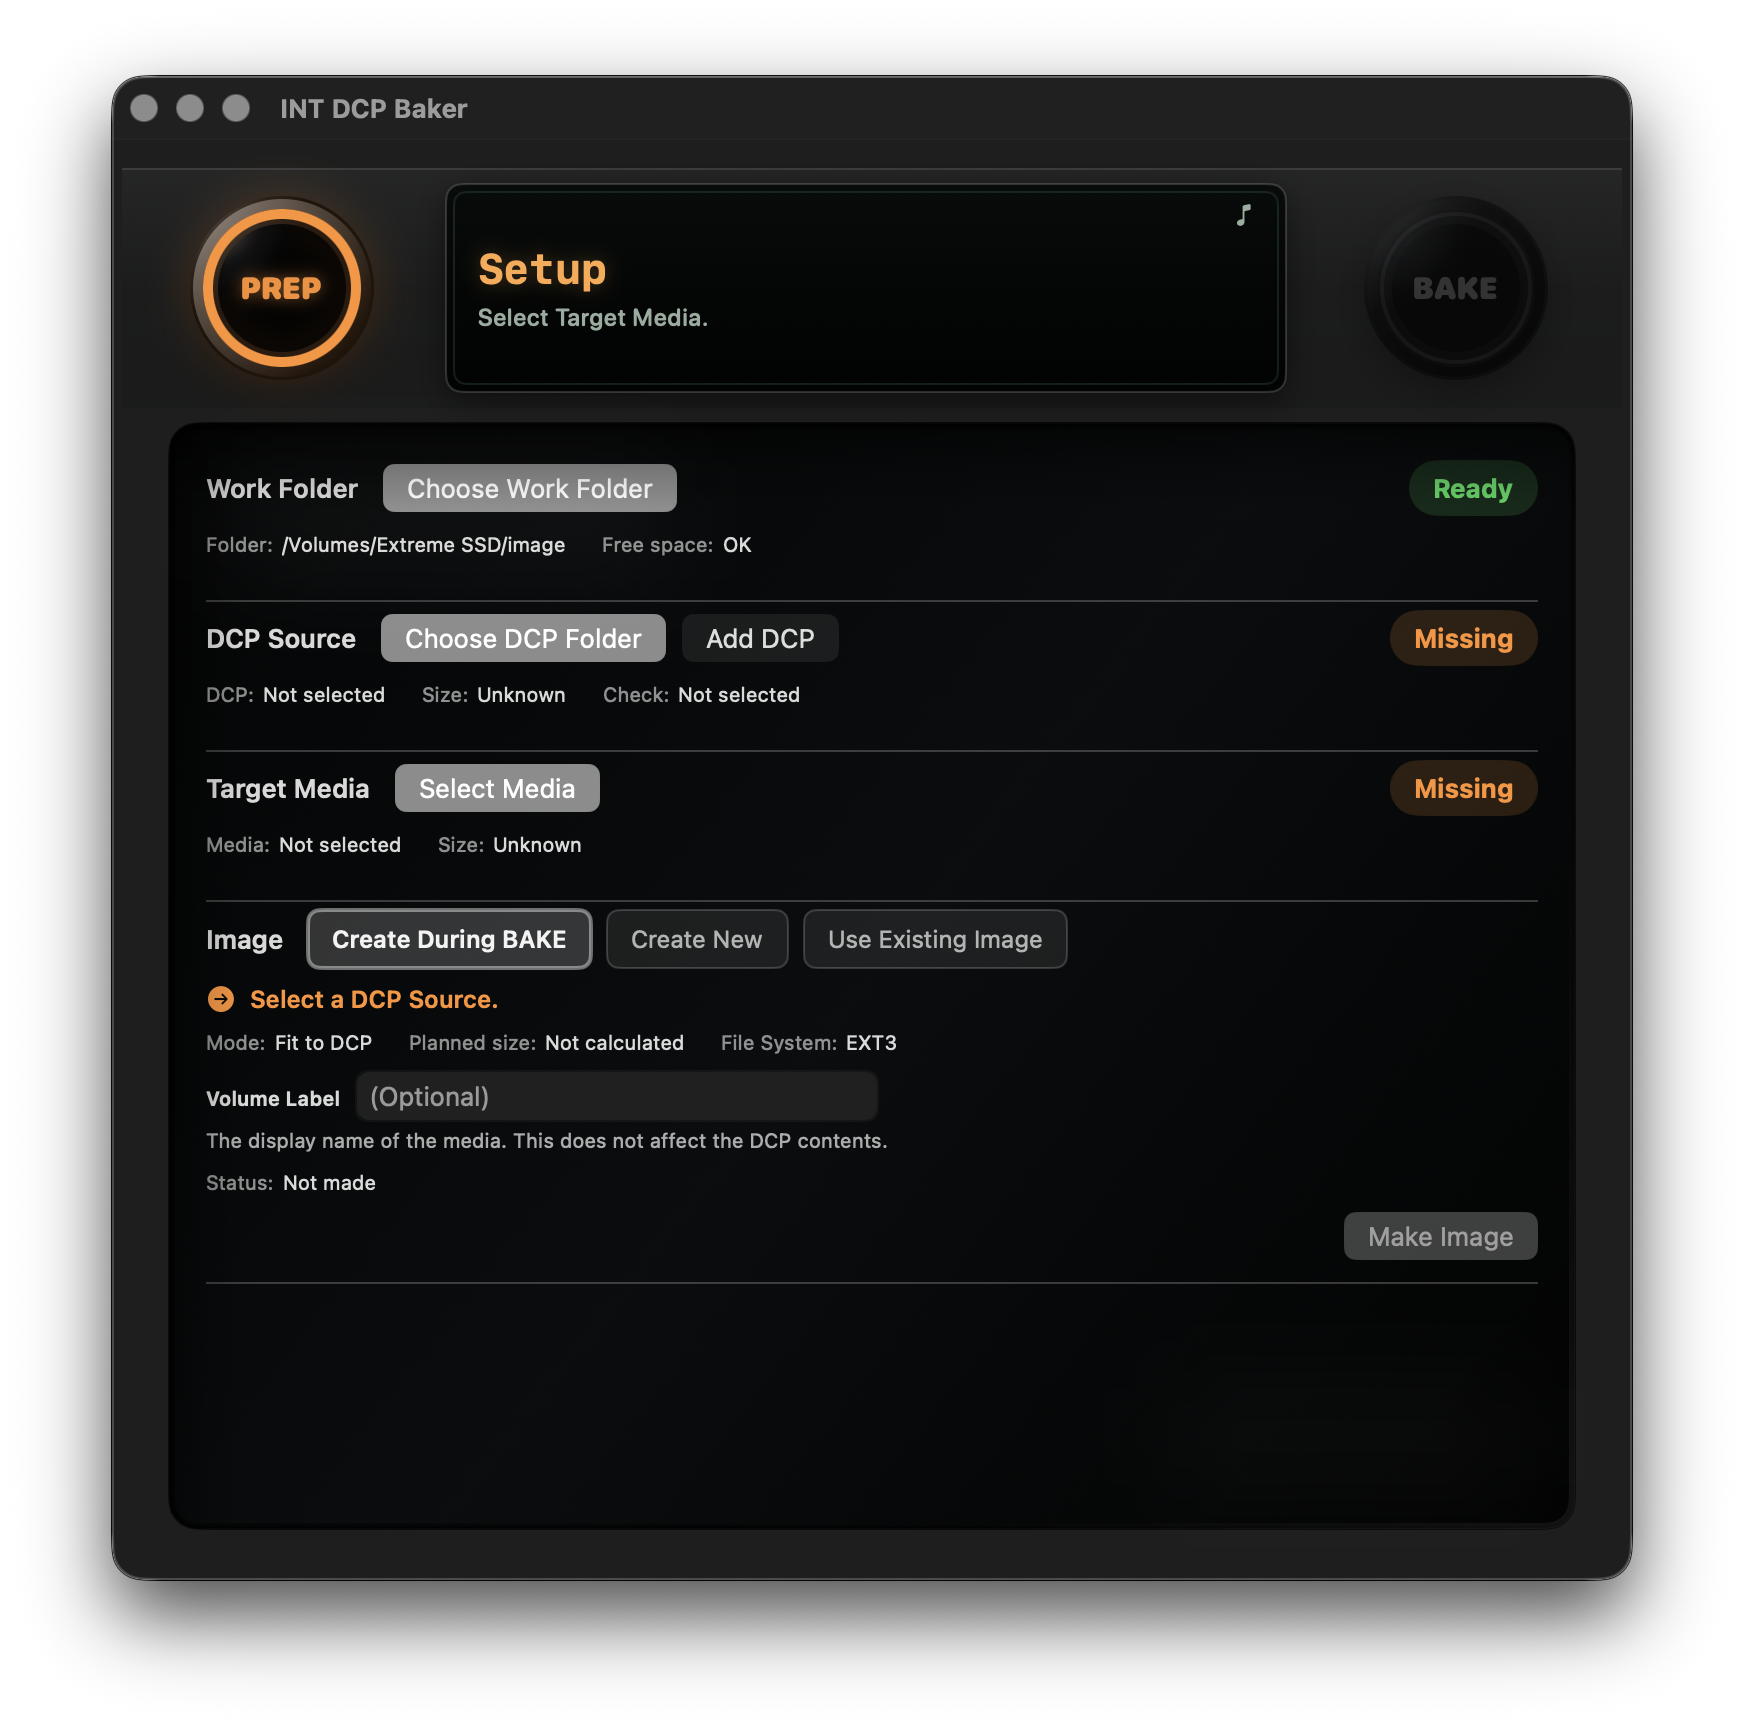
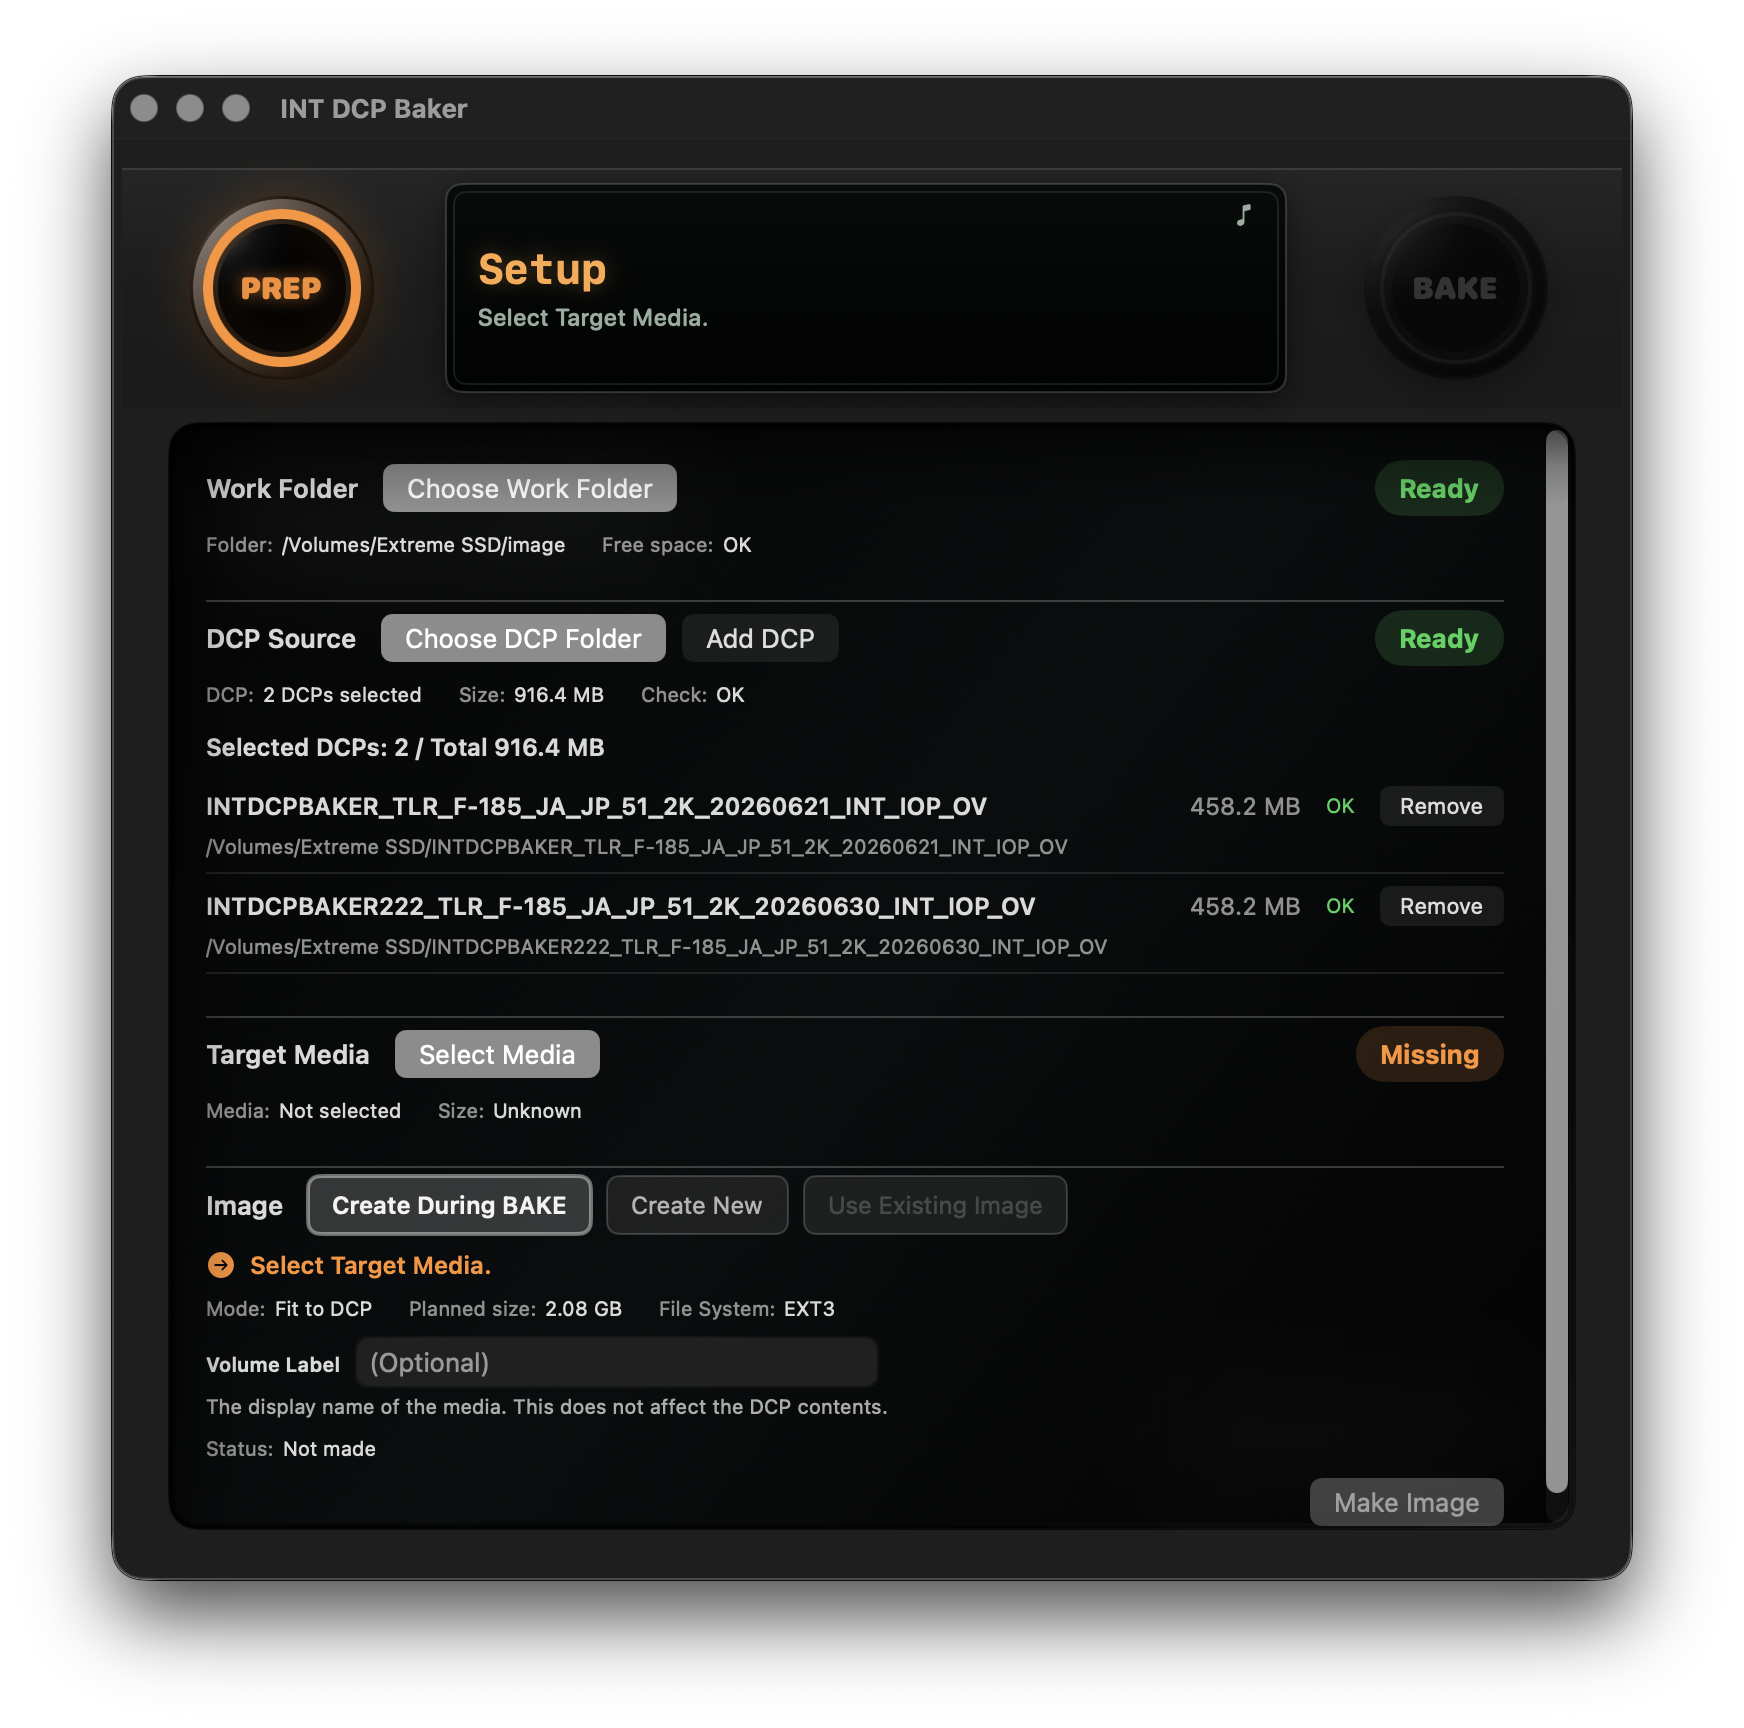
A new delivery job. Create During BAKE is selected, and no Target Media has been selected.
5.1 Status Indications
Orange indicates that the next action is available, preparation is in progress, or confirmation is required. Green indicates completed preparation or processing, and red indicates an error. A dark button indicates that its action cannot yet be started.
5.2 Work Folder
The Work Folder stores images and job results. Select Choose Work Folder, choose a location with the capacity shown onscreen, and check the folder name and Free space. The required free space varies with the DCP Source and image creation mode.
When a new image is created, a dedicated Image Project folder is created inside the Work Folder. Creating another image from the same DCP does not overwrite a completed image.
5.3 DCP Source
To create a new image, select Choose DCP Folder and choose the DCP folder for delivery. The DCP name, size, and Check status are displayed.
To place multiple DCPs on the same media, select them together in the picker or add them with Add DCP.
Removing a DCP from the list does not delete the original source. The onscreen result is a basic check of the DCP folder structure, not an inspection of playback content or a complete DCP validation. DCP Source selection is optional when the image creation mode is Use Existing Image.
5.4 Target Media
Warning
The selected media is completely erased when Bake starts.
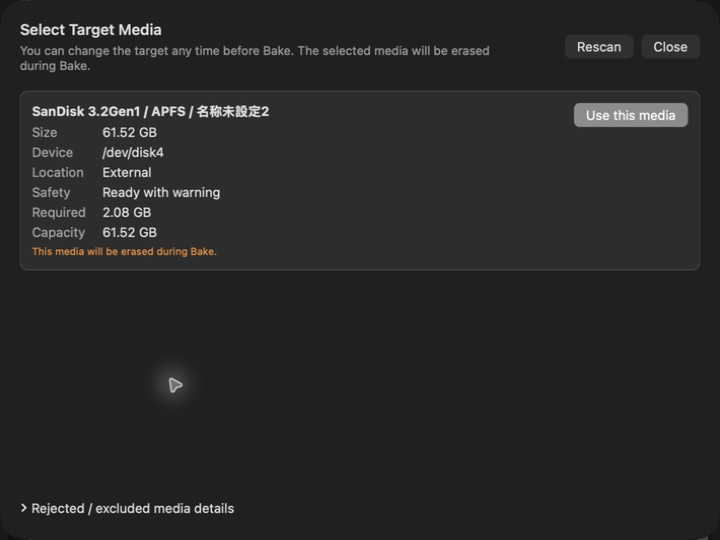
Connect the Target Media to the Mac and select Select Media or Change Media. Check its name and capacity, explicitly select the target, and then select Use this media.
This selection confirms the physical media currently connected. If the media is disconnected during PREP, the selection returns to Not Selected and BAKE is no longer ready. Whether reconnecting the same media or connecting different media, select it again. Another device is never selected automatically.
5.5 Image Workflow
In the Image section, choose the workflow that matches the job.
- Create During BAKE — Creates the image, writes it, and performs readback verification as one BAKE operation
- Create New — Creates only the image and does not write media
- Use Existing Image — Selects a completed, usable image and skips image creation
For normal delivery media creation, use the default Create During BAKE workflow. Chapter 6 explains when to use each workflow.
5.6 Volume Label
The Volume Label is the media display name. It is optional; leaving it blank creates the media without a label. It does not change the DCP content. If a character or length cannot be used, the required correction appears onscreen.
The Volume Label is preserved when changing the Image Workflow within the current job. With Use Existing Image, the Volume Label recorded in that image is used.
5.7 Ready to Bake
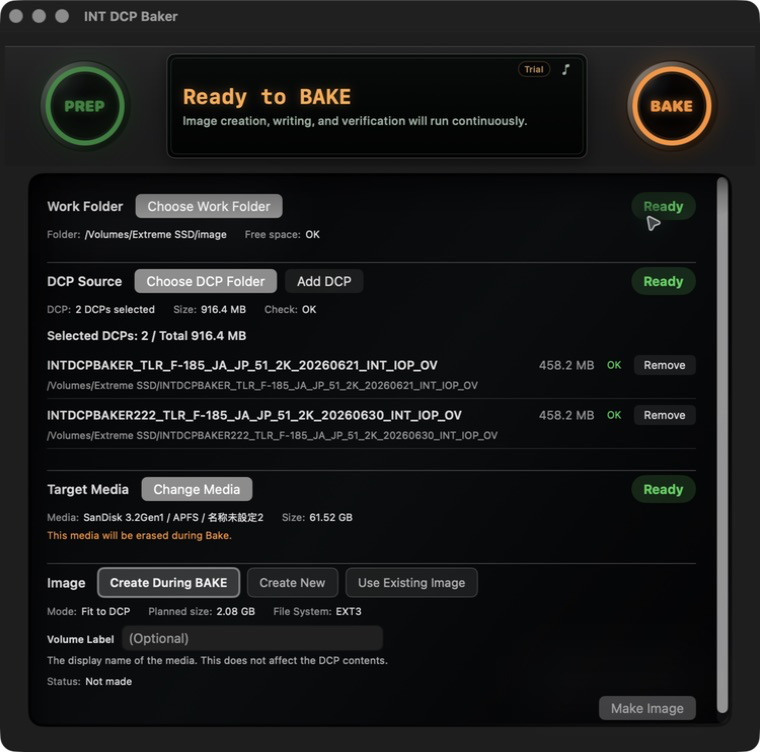
When the required input and safety checks are complete, the LCD shows Ready to Bake and BAKE becomes available. If it does not, review the LCD and each item from top to bottom. Readiness is reevaluated when the DCP Source, Target Media, image settings, Work Folder, or Trial/license state changes.
6. Image Workflows
6.1 Create During BAKE
This is the default workflow for normal delivery media creation. Select the Work Folder, DCP Source, and Target Media, then check the image size, file system format, and Volume Label if needed.
After the final BAKE review, macOS authorization, image creation, media writing, and readback verification proceed as one workflow. If macOS requests administrator authorization, complete it before image creation. Authorization does not need to be repeated between phases.
The completed image remains in the Work Folder and can later be reused with Use Existing Image.
6.2 Create New
This workflow creates only an image without writing it to media. Use it to prepare an image before writing several media copies or for later use.
Select Create New, prepare the Work Folder and DCP Source, and check the image size, file system format, and Volume Label. Press PREP to start image creation. This operation does not erase or write any media.
With Fit to DCP, an image can be created without selecting Target Media. Confirm that the image will fit on the media you intend to use later. With Fit to Media and Custom, select Target Media first.
When image creation completes successfully, the completed image is selected automatically and the workflow changes to Use Existing Image. If Target Media is not selected, select it next. If all requirements are ready, proceed with BAKE.
If notification sounds are on, a short completion sound plays once when image creation completes successfully.
6.3 Use Existing Image
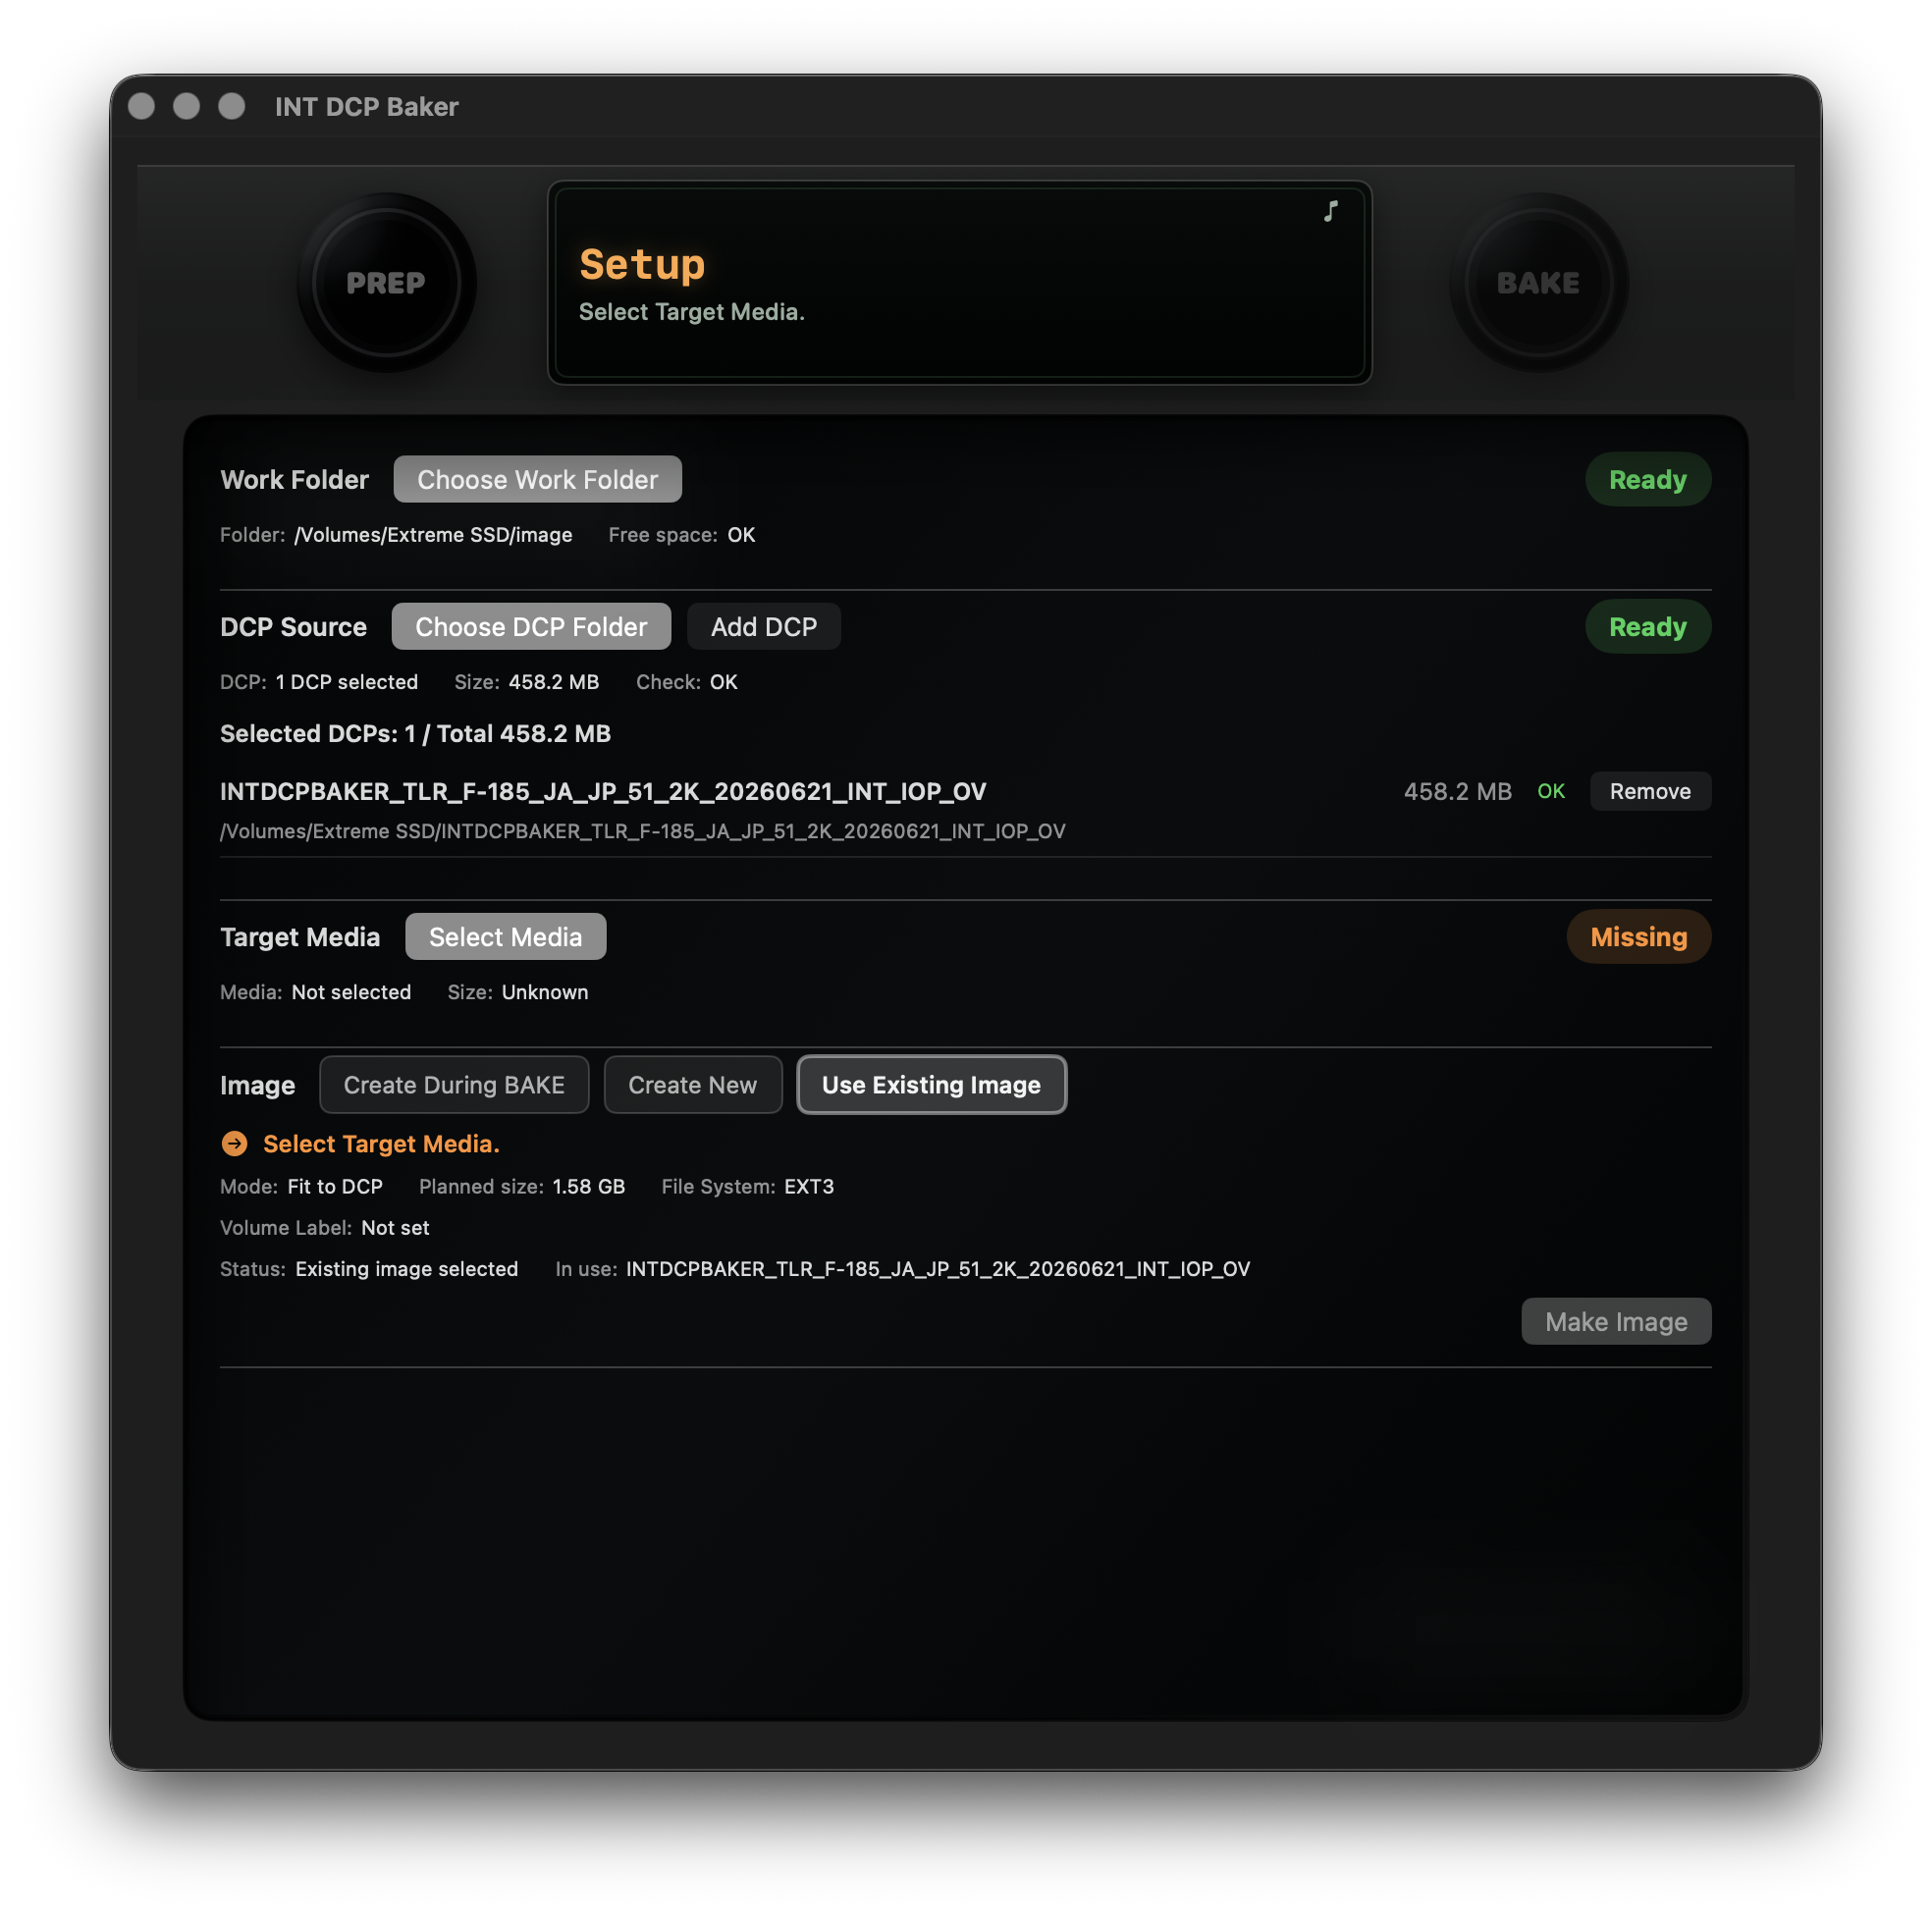
This workflow reuses a completed image in the Work Folder and skips image creation. Selecting Use Existing Image shows each candidate's DCP name, creation date, size, format, DCP count, and status. Select a candidate whose status is Available, review its contents, and select Use. After selection, confirm Existing image selected and the In use name in the Image section.
An incomplete candidate, a candidate whose related files are missing or do not match, or one that does not match the current file system setting cannot be used.
If the selected DCP Source differs from the content recorded in the existing image, a confirmation appears. This is not an error. Select Use only after confirming that it is the intended image.
6.4 Creating Multiple Media Copies
To create multiple media copies with the same content, use the image selected automatically after the first image is created. Connect the next Target Media and explicitly select it again with Select Media. The next Bake can start without recreating the image.
Check the name and capacity each time the media is changed.
7. BAKE
7.1 Final Review and macOS Authorization
BAKE completely erases the selected media. Do not skip the final review.
- Confirm Ready to Bake on the LCD, then press BAKE.
- In Review Bake Plan, check the DCP, image size, file system format, Volume Label, and the Target Media name and capacity.
- Confirm This media will be erased. If the information is correct, select Start Bake.
If the information is not correct, select Cancel to return to PREP. Writing does not start.
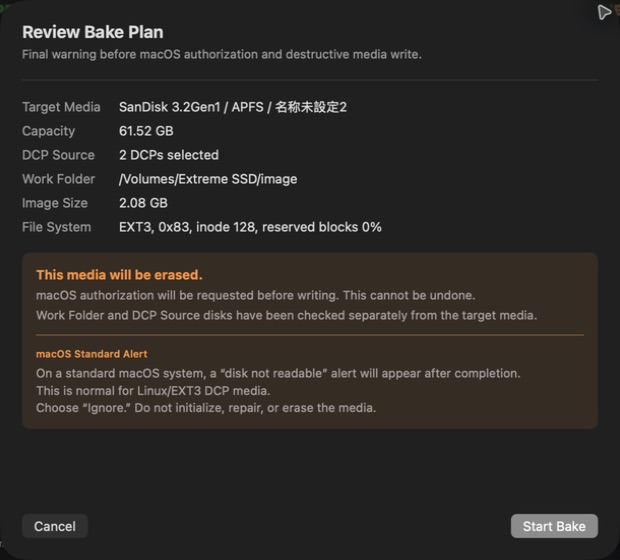
After Bake starts, macOS may request administrator authorization. Complete it if shown. Cancelling authorization prevents image creation and media writing from starting. With Create During BAKE, this authorization occurs before image creation.
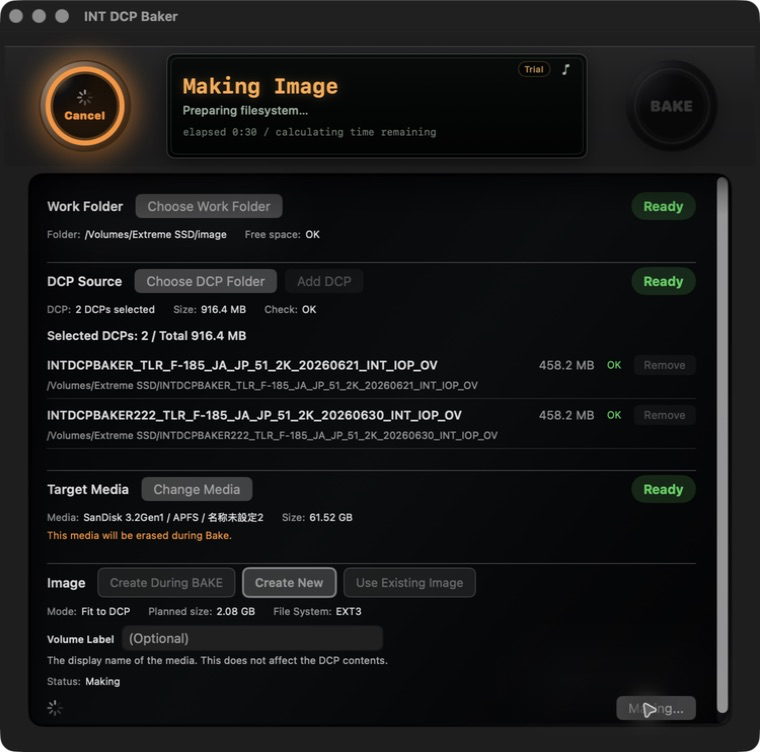
7.2 Image Creation
With Create During BAKE, image creation begins after authorization. Where available, the screen shows the current operation, processed and total DCP data, progress for the current phase, elapsed time since the job began, estimated time remaining, and estimated completion time.
The progress bar represents the current phase and changes to the new phase's progress bar when processing advances. Elapsed time covers the whole job from image creation through writing and readback verification. Remaining time is an estimate based on actual processing and may be adjusted just after startup or when processing conditions change.
7.3 Writing to Media
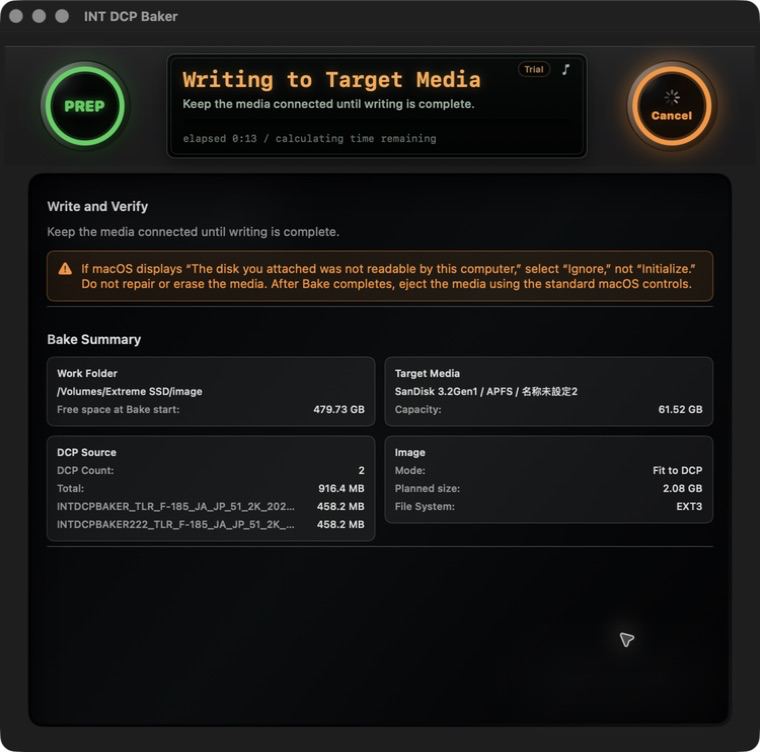
With Create During BAKE, writing begins when image creation finishes. With Use Existing Image, writing begins without image creation. Do not disconnect the media while Writing to Target Media is displayed.
Progress and remaining time are shown for the writing phase. Whole-job elapsed time continues.
7.4 Readback Verification
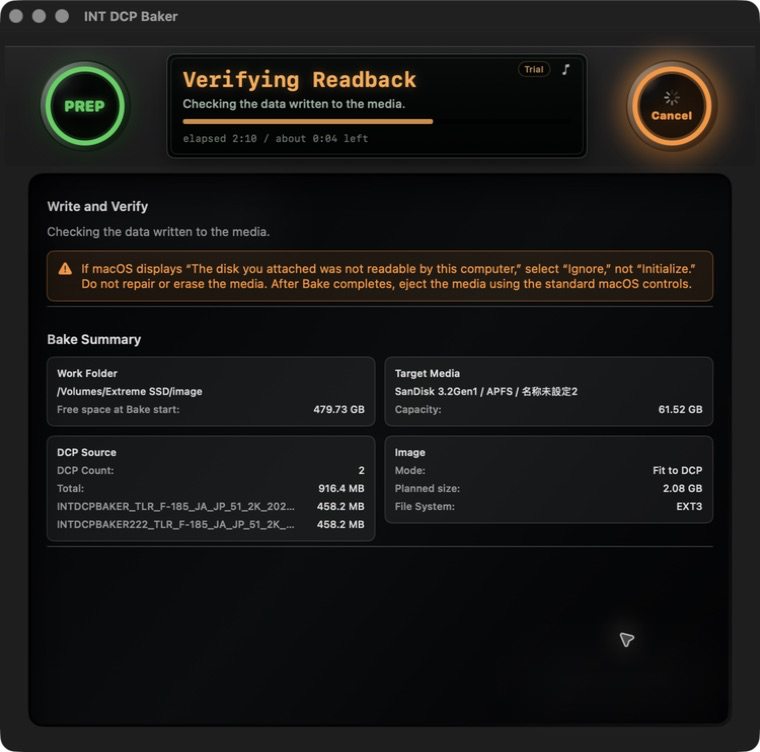
When writing finishes, the progress display resets and changes automatically to Verifying Readback. No user action is required.
Readback verification reads the written range from the media and compares its byte count and SHA-256 with the prepared image. This is byte-level verification of the written result, not an inspection of DCP playback content. Do not disconnect the media until verification is complete.
If macOS Displays an Unreadable Disk Alert
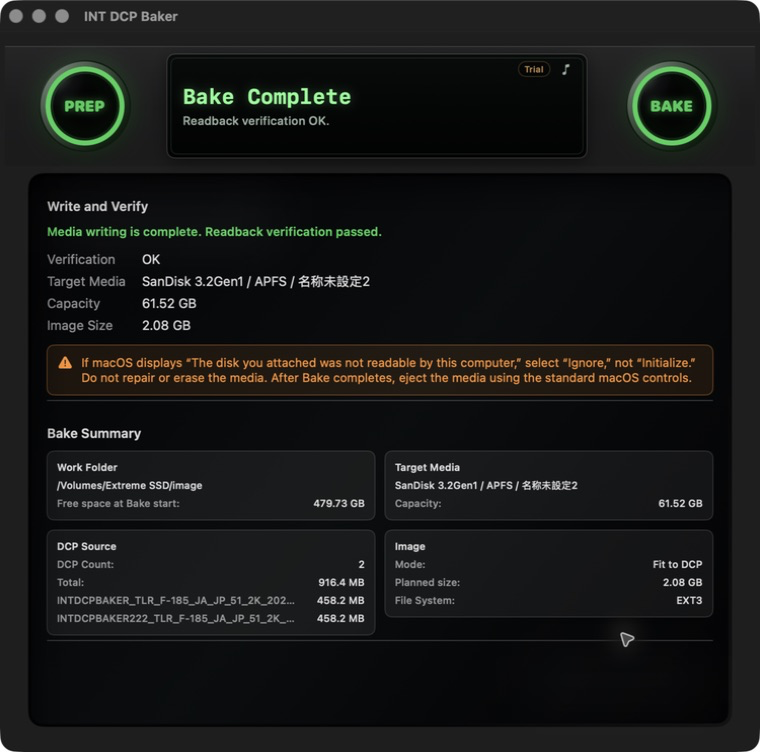
Because macOS does not normally mount EXT3 or EXT2 media as a standard disk, it may report that the disk is not readable.
Select Ignore, not Initialize. Do not repair or erase the media.
7.5 Completion
Delivery media is complete when both Bake Complete and Readback verification OK. are displayed. On the completion screen, the progress bar and processing glow disappear, while the whole-job elapsed time remains available.
If notification sounds are on, a short completion sound plays once after successful completion. With Create During BAKE, it does not play when image creation alone finishes; it plays after writing and readback verification both complete successfully.
After completion, eject the media using the standard macOS controls.
8. Cancel, Failure, and Recovery
During processing, PREP or BAKE becomes the cancel control. Whether the operation is cancelled, fails, or completes successfully, the progress bar and processing glow disappear when processing ends. A cancellation is not treated as a failure.
8.1 Cancelling Image Creation
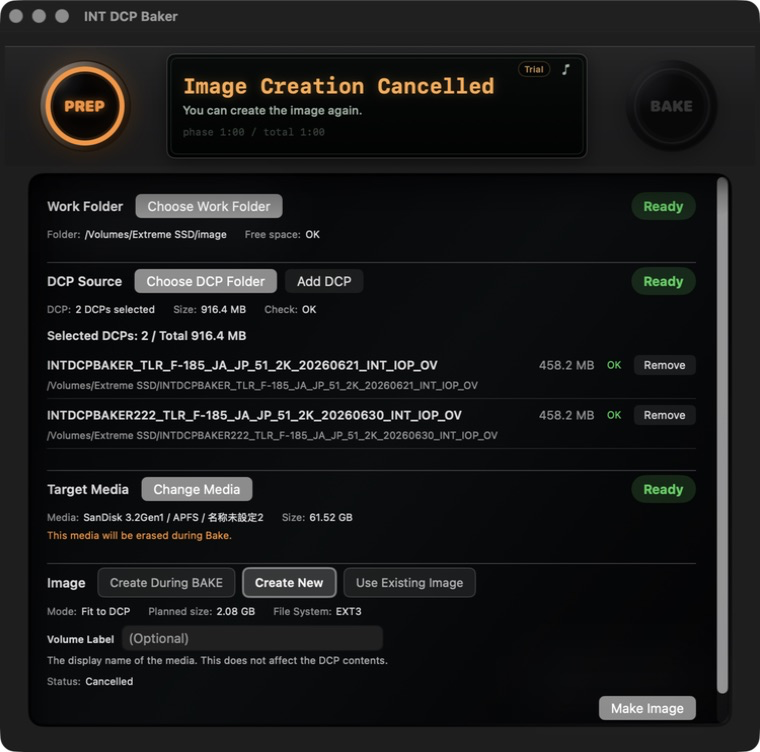
Pressing PREP during image creation shows Stop image creation? Select Go Back to continue, or Stop to cancel.
After cancellation, Image Creation Cancelled and You can create the image again. are displayed. Returning to PREP preserves valid settings such as the Work Folder, DCP Source, Target Media, Image Workflow, and Volume Label.
A partially created image cannot be used.
8.2 Stopping Media Writing
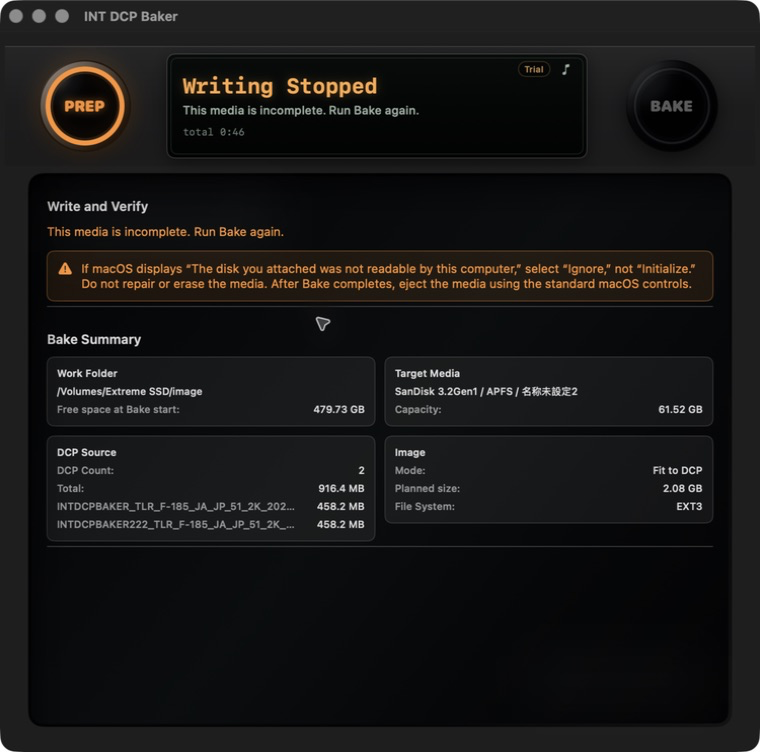
Pressing BAKE while writing shows Stop writing? Select Continue Writing to continue, or Stop Writing to stop.
After stopping, Writing Stopped and This media is incomplete. Run Bake again. are displayed. Partially written media cannot be used for delivery.
8.3 Stopping Readback Verification
Pressing BAKE during readback verification shows Stop Bake? Select Go Back to continue, or Stop to stop.
After stopping, Verification Stopped and This media has not been verified. are displayed. Media without completed verification is not treated as Bake Complete.
8.4 Failure and Returning to PREP
If a failure is displayed, check the title and details onscreen. When Play notification sounds is on, the macOS system alert sounds; when it is off, no sound plays.
Do not use media for delivery if media writing or readback verification failed. Follow the onscreen guidance and, if necessary, select different media and run Bake again from the beginning.
Returning to PREP from a result screen clears temporary state such as the result, progress, and remaining time, while preserving valid job settings.
9. Bake Report
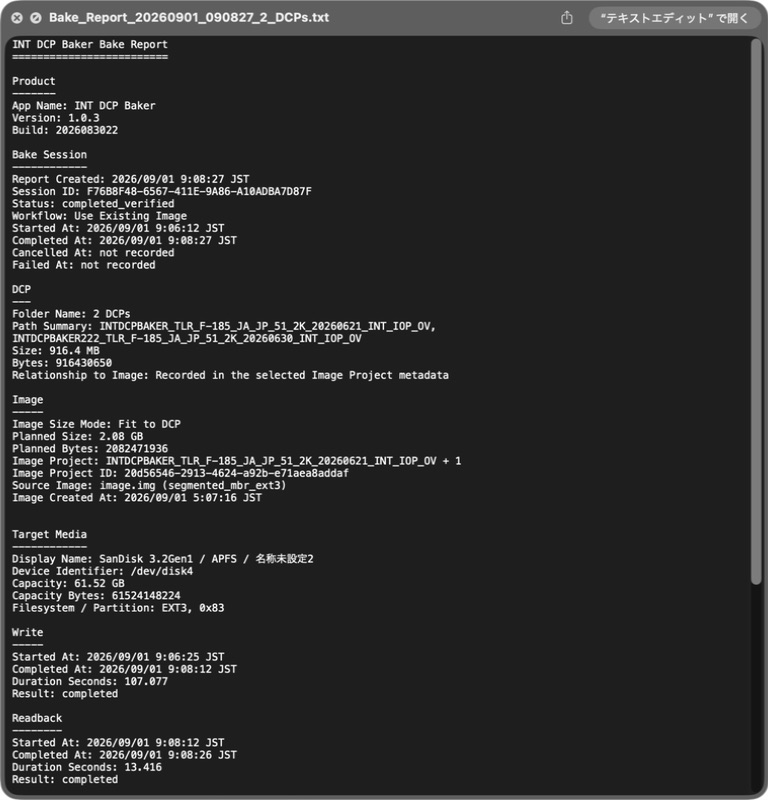
After Bake and readback verification complete successfully, a text Bake Report is saved automatically. It is created at the following location inside the Work Folder selected by the user.
<selected Work Folder>/Bake Reports/A Bake Report contains the following principal information.
- Product version and processing date and time
- DCP Source summary
- Image-size method, size, format, and Volume Label
- Target Media information
- Media writing and readback verification results
- SHA-256 values for the source image, written data, and readback data
- Start and completion times for the whole Bake, and durations for writing and readback
Keep the Bake Report as a delivery record and use it as support information if a problem occurs.
10. Troubleshooting
10.1 BAKE or PREP Cannot Start
Review the LCD and each item from top to bottom. Processing cannot start if the Work Folder lacks free space, the DCP Source check is incomplete, the workflow lacks required Target Media, or the image size, file system format, Volume Label, image creation environment, or Trial/license state is not ready.
Create New is a PREP-only workflow. After successful image creation, the completed image is selected automatically and the workflow changes to Use Existing Image. Select Target Media if required.
10.2 The Work Folder Does Not Have Enough Free Space
Compare the required capacity and free space shown in PREP, then select another Work Folder with sufficient capacity. Completed Image Projects are not deleted automatically. Users should review and organize unneeded output themselves.
10.3 Remaining Time Is Unstable or Not Displayed
Remaining time is an estimate based on actual processing. It is adjusted just after startup, when processing speed changes, or when the phase changes.
10.4 An Existing Image Cannot Be Selected
An incomplete candidate, a candidate whose related files are missing or do not match, or one that does not match the current file system setting cannot be used. Select another Available candidate or create a new image from the DCP Source.
10.5 Target Media Returned to Not Selected
When the selected physical media is disconnected, the selection is cleared for safety. Reconnect the media and explicitly select it again with Select Media.
10.6 macOS Reports That the Disk Is Not Readable
Select Ignore. Do not initialize, repair, or erase the media.
10.7 Readback Verification Does Not Complete
Media without completed readback verification cannot be used for delivery. Check the displayed error and, if necessary, select different media and run Bake again from the beginning.
10.8 The Image Creation Environment Cannot Be Prepared
Select Recheck and review the onscreen guidance. If required files cannot be found, reinstall INT DCP Baker.
10.9 Contacting Support
Record the screen and message, the operation that caused the problem, the INT DCP Baker and macOS versions, the time of the problem, and the relevant Bake Report.
11. Uninstallation
11.1 Opening the Uninstaller
In Finder, open Applications > INT DCP Baker, then launch Uninstall INT DCP Baker.
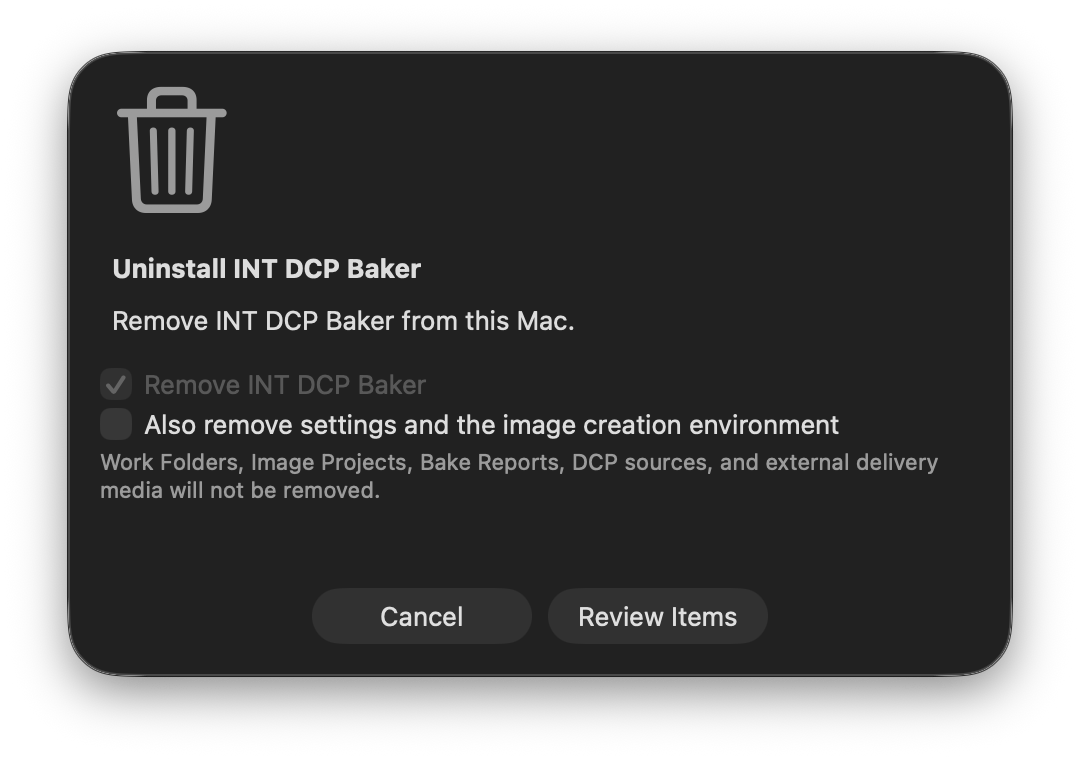
The Work Folder selected in PREP, its Image Projects, completed images and sidecars, and Bake Reports are retained as user output. Original DCP Source and external delivery media are also retained. Bake Reports are retained by both Standard and Complete Uninstallation, regardless of their known product-era storage location.
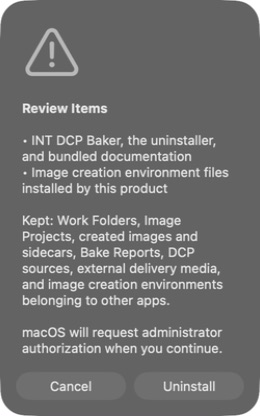
11.2 Standard Uninstallation
To remove the application and required runtime components while retaining settings, license state, logs, caches, setup state, and the Image Creation Environment, do not select Also remove settings and the image creation environment.
- Select Review Items and review the items to be removed and retained.
- Select Uninstall and complete macOS authorization.
- Review the result screen.
11.3 Also Removing Settings and the Image Creation Environment
Selecting Also remove settings and the image creation environment removes, in addition to the application and required runtime components, known application-owned settings, license state, logs, caches, setup state, the Image Creation Environment managed by INT DCP Baker, and disposable runtime state.
- Select Review Items and review the displayed items to be removed and retained.
- Select Uninstall and complete macOS authorization.
- Review the result screen.
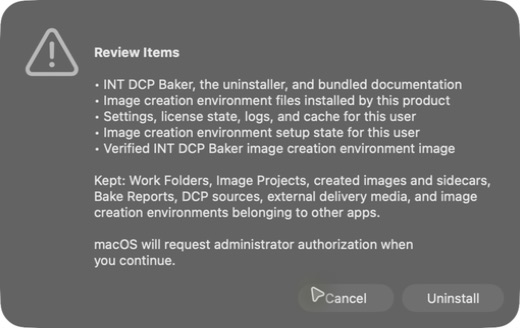
The Work Folder, Image Projects, completed images and sidecars, Bake Reports, original DCP Source, and external delivery media are retained. Bake Reports in locations used by earlier product versions are also retained as delivery records.
If the Image Creation Environment cannot be removed, the displayed choices let you Try Again, keep the environment and Continue Removing Other Items, or Stop Uninstall. Because application-owned items processed before you stop may remain changed, review the result screen.
Appendix A. Image and Verification Specifications
A.1 Partition and File System
| Item | Specification |
|---|---|
| Partition scheme | MBR (DOS partition table) |
| Number of partitions | One primary partition |
| Partition type | Linux (0x83) |
| Partition start | LBA 2048 (1 MiB from the beginning of the disk) |
| Alignment | 1 MiB boundary |
| File system | EXT3 (default) or EXT2 |
| Volume Label | Optional; no label when blank |
| inode size | 128 bytes |
| Reserved blocks | 0% |
| DCP placement | Each selected DCP is placed in its own folder at the top level of the file system |
| Post-creation check | File-system consistency is checked read-only |
Files retain their original directory structure within each DCP folder.
A.2 Image Size
| Setting | How Size Is Determined |
|---|---|
| Fit to DCP | Based on the DCP data and the space required by the file system |
| Fit to Media | Based on the usable capacity of the selected Target Media |
| Custom | Uses the specified capacity; it must fit the DCP and not exceed the selected media capacity |
Check the final Planned size and capacity decision in PREP.
A.3 Writing to Media
During Bake, the complete image—including the MBR, EXT3 or EXT2 partition, and DCP data—is written sequentially from the beginning of the physical media. This differs from a normal file copy.
A.4 Readback Verification
After writing, the written range is read back from the same media. The application confirms that the read byte count matches the image size and that the SHA-256 of the readback data matches the SHA-256 of the source image. Verification covers the complete written image, not only the DCP files.
A.5 User-Configurable Items
| Item | Choices |
|---|---|
| File system | EXT3 Recommended / EXT2 Compatibility |
| Image size | Fit to DCP / Fit to Media / Custom |
| Volume Label | Optional entry / blank (no label) |
Compatibility specifications such as MBR, Linux partition type 0x83, inode size 128 bytes, and 0% reserved blocks do not need to be changed during normal operation.